Stunning Ribbon Decorations for Christmas Trees & Ideas
Using ribbons to decorate your Christmas tree is the secret behind that professional, layered look that baubles alone just can't quite manage. It’s what adds that lovely texture, colour, and unifying flow, tying your whole festive theme together. It’s the difference between a tree that’s simply decorated and one that’s beautifully designed.
Why Ribbon Is Your Secret Decorating Weapon
Think of ribbon as more than just an accessory; it's the foundation of a really well-dressed Christmas tree. It has a knack for filling in those little visual gaps between the branches, and it introduces a sense of movement with elegant cascades. Most importantly, it helps establish a cohesive colour palette from top to bottom.
I like to think of it as the garland's more sophisticated cousin. It provides a structure and polish that just elevates every other decoration you add afterwards.
This brilliant tool works for any aesthetic you can dream of:
- For a rustic theme: A wide burlap or plaid ribbon can create that cosy, farmhouse feel we all love.
- For modern elegance: Try a slim, velvet or satin ribbon in a single colour for a real touch of luxury.
- For a playful vibe: Mix and match colourful, patterned ribbons for a whimsical and fun display that’s full of personality.
The tradition of using ribbons has deep roots, becoming especially popular here in the UK during the Victorian era. It all kicked off with an 1848sketch of Queen Victoria and Prince Albert’s tree, which was adorned with sweets hanging from ribbons. That single image inspired households across the nation to adopt the practice. If you're a bit of a history buff, you can discover more about this festive history from Christmas Tree World.
Ribbons do more than just decorate; they guide the eye. A well-placed ribbon cascade can make a tree appear taller, fuller, and more thoughtfully curated, giving it that coveted designer touch without the hefty price tag.
Choosing the Perfect Ribbon for Your Tree
Getting the ribbon right is the very first step, and honestly, it’s the most important one. It's what makes the difference between a frustrating tangle of limp fabric and a stunning, elegant cascade down your Christmas tree. If you take away only one piece of advice, let it be this: always choose a wired ribbon.
Trust me, wired edges are a complete game-changer. They give you the power to bend, shape, and fluff the ribbon into gorgeous, full billows and bows that will hold their shape all season long. Non-wired ribbon might be lovely for wrapping presents, but on a tree, it just droops and disappears into the branches, losing all its definition.

Consider Material and Width
The material you choose really sets the tone for your whole tree. A rich, plush velvet ribbon brings a wonderful touch of luxury and warmth, which is perfect if you’re going for a traditional or glamorous theme. If you’re aiming for something more like a cosy, farmhouse aesthetic, a rustic burlap or a classic tartan plaid works beautifully.
For a more modern and sleek look, you could consider a shimmering satin or even a delicate organza. If you're looking for inspiration, you can find a wonderful selection of velvet ribbons for your project here.
The width of the ribbon is just as crucial. A common mistake I see is people choosing a ribbon that's too narrow for their tree, which can look a bit spindly and gets completely lost among the branches.
- For larger trees (7ft and taller): You’ll want to go for a wider ribbon, something between 2.5 to 4 inches. You need that scale to make a real visual impact.
- For smaller or slender trees (under 6ft): A ribbon around 1.5 to 2.5 inches wide will look much more balanced and won't overwhelm the tree.
As a rule of thumb, I always plan for at least 3 metres of ribbon per vertical foot of the tree. So, for a 7-foot tree, you'll want around 21 metres (that’s about 70 feet) to get that lovely, full look. It’s always better to buy an extra roll than to run out halfway through!
Choosing Your Ribbon: A Quick Comparison
To help you decide what's best for your project, I've put together a simple breakdown of the most common ribbon choices. Each has its own personality and works best for different styles.
| Ribbon Type | Best For | Ease of Use | Aesthetic |
|---|---|---|---|
| Wired Velvet | Creating luxurious, full bows and deep, elegant cascades. | High (holds shape perfectly) | Traditional, Glamorous |
| Wired Burlap | Achieving a cosy, natural, or farmhouse-inspired look. | High (very forgiving) | Rustic, Country |
| Wired Satin | Adding a sleek, shimmering touch to modern or formal trees. | Medium (can show creases) | Modern, Elegant |
| Non-Wired | Tying small, simple bows onto individual branch tips. | Low (for cascading) | Delicate, Simple |
Ultimately, the best ribbon is the one that fits your tree's theme and is easy for you to work with. Don't be afraid to mix and match textures, either—combining a wide burlap with a narrower satin can create some beautiful depth and interest
How to Put Ribbon on Your Christmas Tree
Right, this is where the magic really starts and your tree begins to come to life. Adding ribbon can feel a bit daunting, but trust me, it's much easier than it looks once you get the hang of a few simple techniques. I'll walk you through three of my favourite methods, each giving your tree a completely different personality.
The secret to a professional-looking tree is to avoid a really common mistake: pulling the ribbon too tight across the branches. You want to create soft, natural-looking billows. Always, always start from the top of your tree and work your way down, tucking the ribbon deep into the branches rather than just draping it over the tips.
The Classic Spiral Wrap
This is a timeless technique that gives you a gorgeous, flowing look that gracefully circles your tree.
Start by tucking the end of your ribbon into the top back of the tree. I find the easiest way to secure it is just by twisting one of the branches around it. From there, gently guide the ribbon downwards in a spiral, trying to keep the spacing between each loop fairly even as you go.
As you work your way around, create a ‘bubble’ or ‘billow’ every foot or so. You do this by pushing the ribbon into a branch and securing it in place. This is what gives it that lovely, full appearance instead of looking flat.
The Elegant Vertical Cascade
If you're after a bit of drama and elegance, the vertical cascade is perfect. I love this method because it can make your tree look taller and grander than it actually is.
You'll begin just like you did with the spiral wrap, securing the ribbon right at the top. But instead of wrapping it around, you're going to let the ribbon fall straight down. Create those soft billows every 12-18 inches by tucking a section of the ribbon deep into the branches.
When you reach the bottom, snip the ribbon. Then, move a little further around the tree and start a new cascade. You'll want to repeat this 3-5 times, depending on how wide your tree is, to get a nice, balanced effect.
Here's a tip I've learned over the years: step back from the tree often to check your work. It helps you see the overall balance and make sure your ribbon cascades are evenly spaced and flowing nicely. It's so easy to get lost in the details when you're up close!
The Charming Bow Cluster
For a more whimsical or rustic style, using bows is a fantastic option. This technique is all about creating individual bows and then placing them strategically around the tree. It’s also a brilliant way to use up shorter lengths of ribbon or to add pops of colour and texture exactly where you want them.
To get started, you'll need a good quality material. I highly recommend you explore a great range of wired edged Christmas ribbons, as the wire is essential for helping the bows hold their shape.
This visual guide shows the simple process of creating beautiful bows to attach to your tree branches.
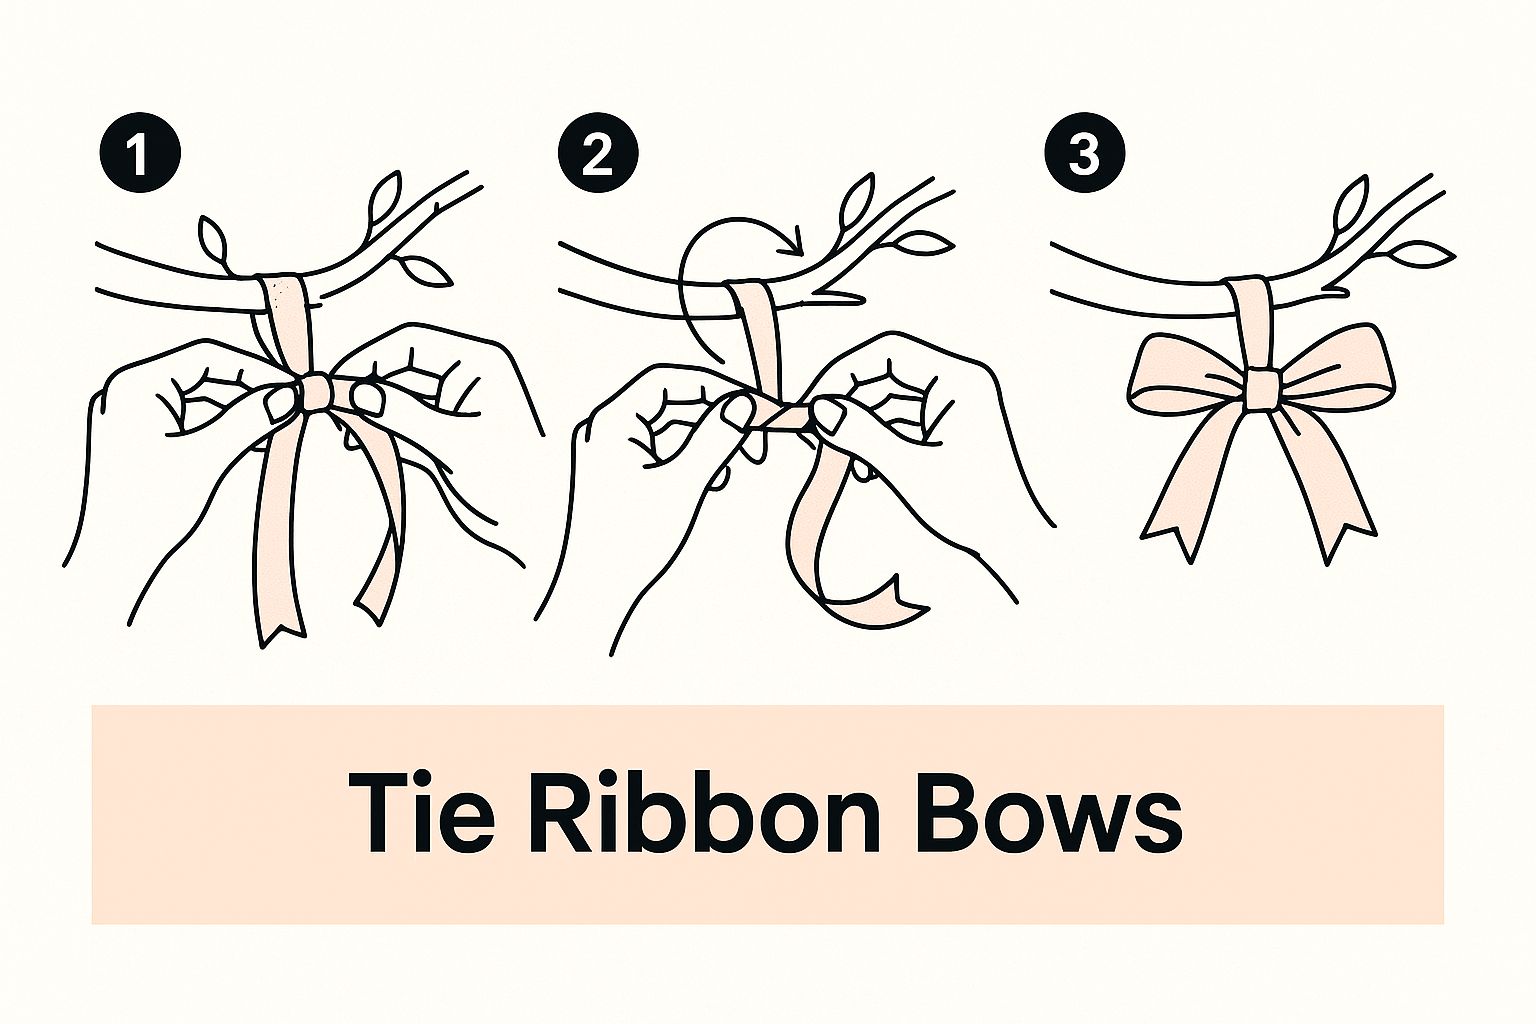
Once you've mastered a simple bow-tying technique, you can create custom accents to fill any gaps and add a really personal touch throughout your design.
Creating a Cohesive Look with Colour and Texture
Think of your ribbon as the thread that pulls your entire Christmas tree design together. When chosen well, it harmonises with your ornaments and creates a polished, intentional look, rather than just a random jumble of decorations. The best place to start is with your existing colour scheme.
Are your baubles classic reds and golds, or have you gone for a cooler, more contemporary palette of silver and icy blue? Your ribbon should either match these colours directly for a monochrome feel or complement them to add a bit of warmth or contrast. For example, a beautiful champagne gold ribbon can bring a lovely warmth to a tree decorated with deep navy and silver ornaments.
Mixing Textures for Depth
Once you’ve settled on your colour palette, here’s a real designer trick: play with texture. Combining different finishes adds an incredible amount of depth and visual interest, making your tree feel much more dynamic and alive. It's all about how different materials catch the light from your fairy lights.
Here are a few combinations I’ve found work beautifully over the years:
- Satin and Matte: Pair a shimmering, wide satin ribbon with non-reflective, matte baubles. The contrast is fantastic and makes both elements pop.
- Burlap and Glass: There's something special about a rustic, coarse burlap ribbon woven amongst delicate, shiny glass ornaments. It’s a classic rustic-glam look.
- Velvet and Metallics: The plush, light-absorbing quality of velvet creates a luxurious, deep backdrop that makes sparkling metallic decorations really stand out.
Layering textures like this is a simple strategy that stops your tree from looking flat and one-dimensional. It’s an easy win that delivers a high-impact, professional result.
Don't be afraid to use more than one type of ribbon! Layering a wide, solid-coloured ribbon with a narrower, patterned one on top can create a truly bespoke look. A 3-inch wide red velvet paired with a 1.5-inch gold glitter ribbon is a classic and wonderfully festive combination.
The desire for a fresh festive look is always strong. In fact, a recent study found that 52% of British households buy new decorations each year, showing just how much we love to personalise our decor with trendy items. Ribbons are a brilliant, affordable way to completely update your tree's theme without having to replace all your ornaments.
If you're ready to explore a huge variety of hues, you can shop by colour for the perfect ribbon to complete your vision. You can also find more details on UK decorating trends from this recent study on festive habits.
Adding the Final Flourishes with Ribbon
Your main ribbon is beautifully woven through the tree, but we’re not quite finished yet. A few final details can really complete the look, giving your tree that polished, professionally-styled feel. Let's start with a stunning focal point right at the very top.
Crafting a coordinated tree topper bow is much simpler than it looks, especially if you're using wired ribbon. The trick is to create several loops of varying sizes, pinch them all together in the centre, and then secure them tightly with a bit of floral wire.
I always recommend leaving a couple of long tails that can cascade elegantly down the sides of the tree. This is a brilliant way to connect the topper to the rest of your ribbon and create a lovely, flowing effect.
Using Leftover Ribbon Scraps
Whatever you do, don't let any of your gorgeous ribbon go to waste! Those smaller offcuts are perfect for adding personality and filling in any sparse areas you might have missed. This is where you can get really creative and tie the entire design together.
Here are a few of my favourite ways to use up the last bits:
- Miniature Bows: Tying small, simple bows directly onto the tips of individual branches is a wonderful way to add a pop of colour or texture in areas that look a little bare.
- Ornament Hangers: This is such a simple but effective trick. Swap out standard metal hooks for short lengths of narrow ribbon. Tying your favourite baubles with matching ribbon adds a subtle but incredibly cohesive touch.
- Faux Gift Ornaments: Find some tiny craft boxes (old jewellery boxes work a treat!) and wrap them with your leftover ribbon. Add a small bow on top, attach a loop of thread, and hang them on the tree as unique, personalised ornaments.
These small, thoughtful additions are what transform a nicely decorated tree into a spectacular one. They show a real attention to detail and ensure your theme is carried through from the very top to the lowest branches, creating a harmonious and complete festive display.
Common Christmas Tree Ribbon Questions
Even if you’ve been decorating trees for years, adding the ribbon can still throw up a few questions. Getting those little details right can be the difference between a frustrating tangle and a beautifully finished tree that looks professionally styled. Let's run through some of the most common queries I hear.
One of the first things people ask is, "how much ribbon do I actually need?" A good rule of thumb is to have around 3 metres of ribbon for every vertical foot of your tree. So, for a standard 7-foot tree, you’ll want to have at least 21 metres (that’s about 70 feet) on hand to get that lovely, full cascade effect. I always recommend buying an extra roll – it’s far better to have a bit left over than to run out halfway through!
When and How to Add Ribbon
The order you decorate in is another common point of confusion. For the best results, always, always put your ribbon on after the lights but before any of the baubles or other ornaments. This approach lets you weave the ribbon deep into the branches, creating that all-important depth and flow. Your ornaments can then be placed perfectly around the ribbon, filling in the gaps.
Once the festive season is over, storing your ribbon properly is key to using it again.
To keep your wired ribbon looking perfect for next year, try not to fold or crease it. Instead, gently roll it back onto its original spool. If you've thrown that out, a cardboard tube from an empty kitchen roll works a treat. This simple step prevents annoying kinks and keeps the wire in great shape.
Follow this advice, and your favourite ribbons will stay pristine and ready for many more Christmases to come.
Ready to create your most beautiful Christmas tree yet? Find the perfect material, colour, and width for your vision at Ribbons4u Ltd. Explore our extensive collection of high-quality festive ribbons at https://ribbonsforyou.com.


 Facebook
 Twitter
 Pinterest