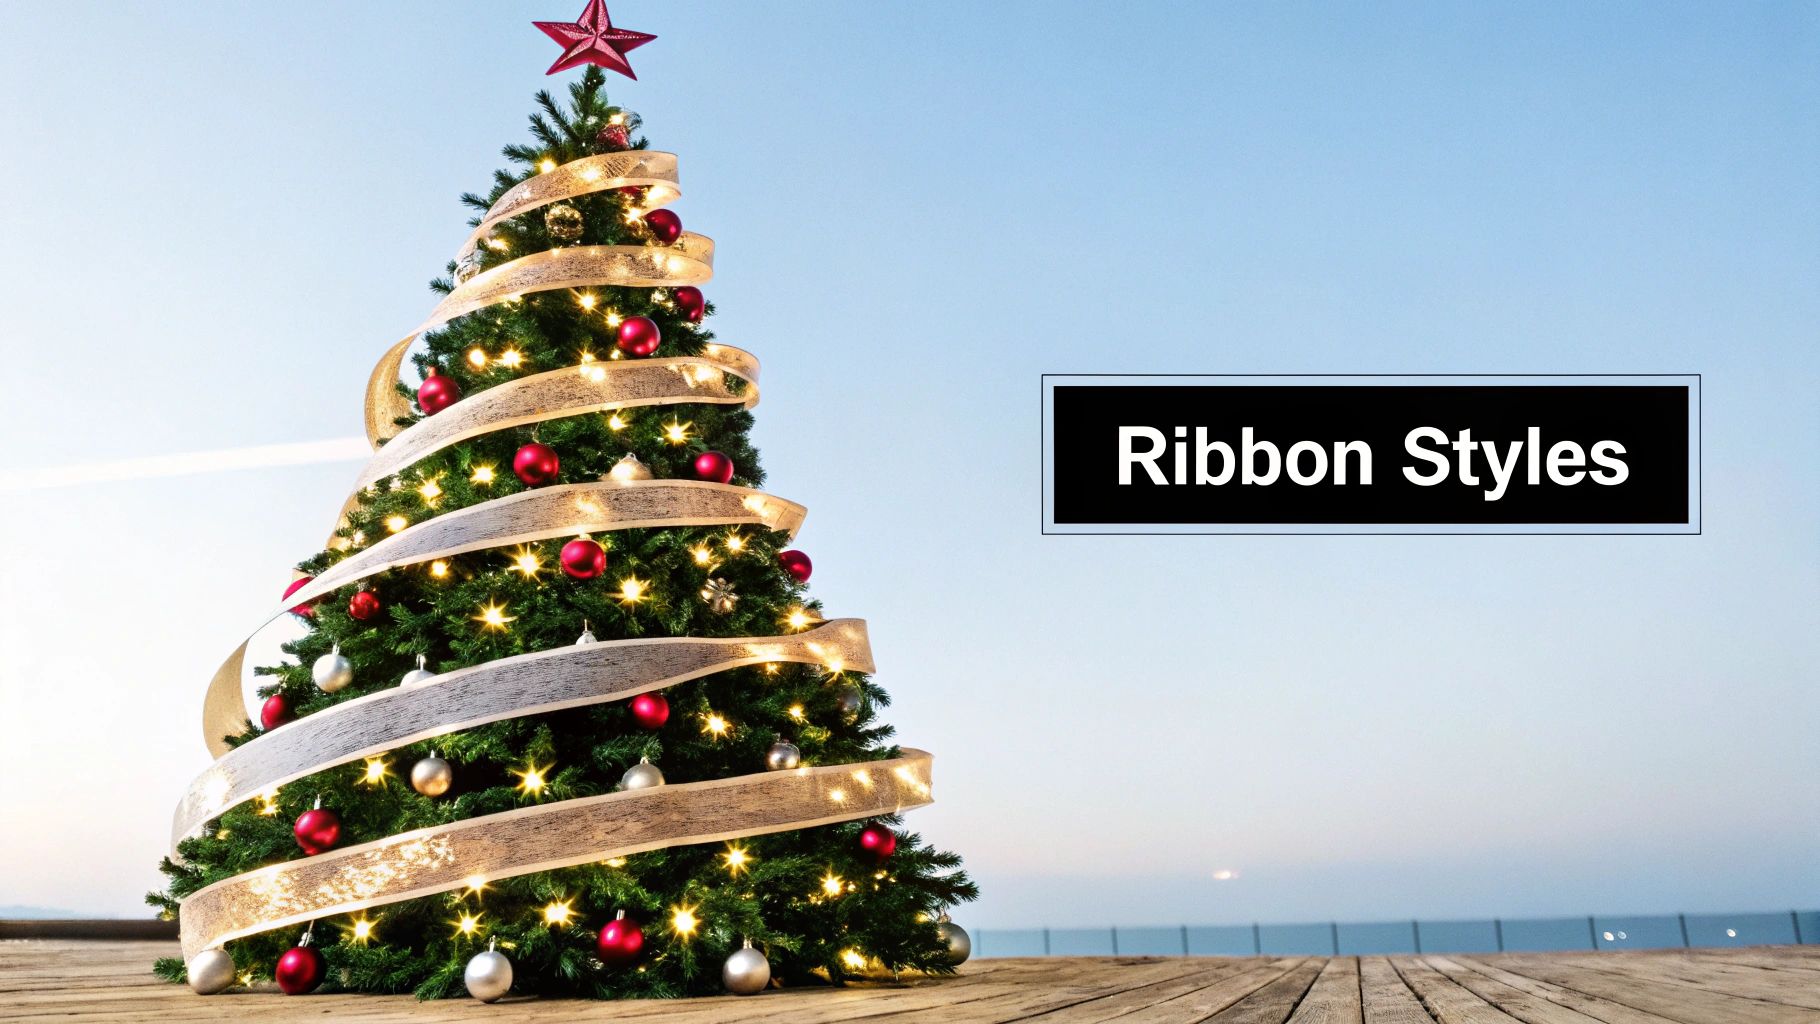
Decorated Christmas Trees with Ribbons: Easy Decorating Tips
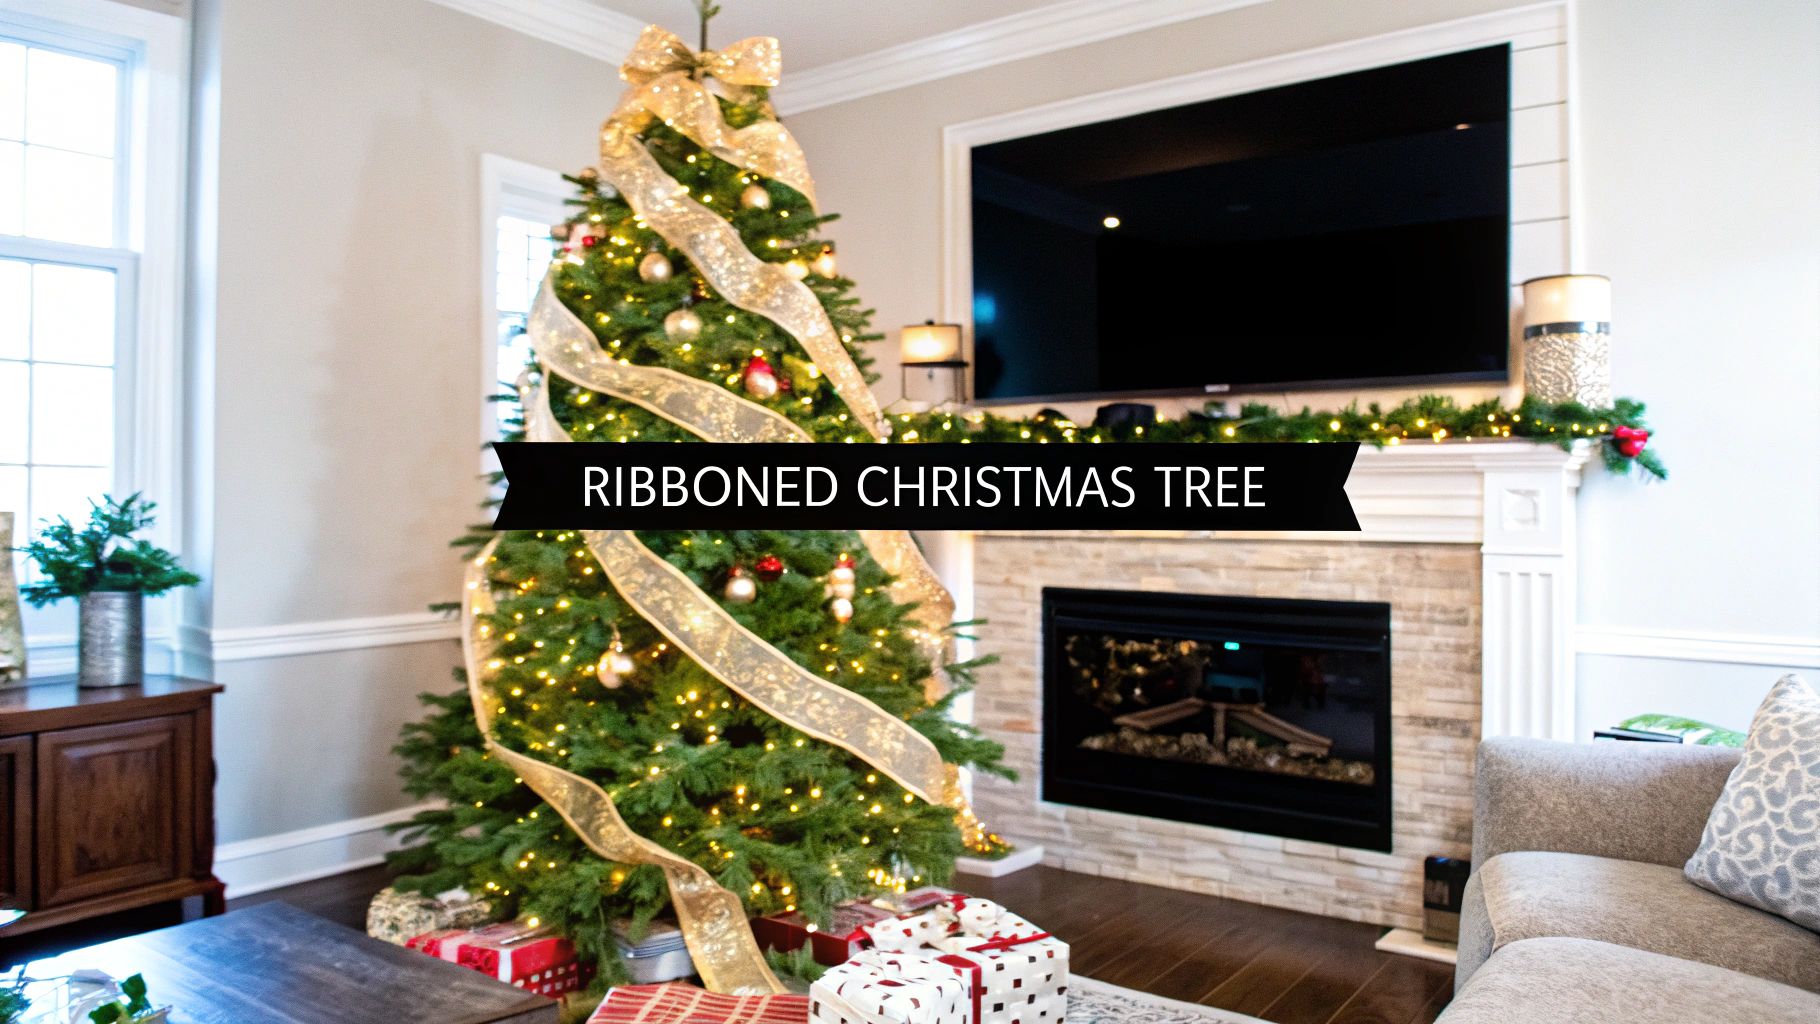
Adding ribbons is one of the fastest ways to give your festive decor a lift, transforming a simple evergreen into a stunning centrepiece. It’s a technique that adds texture, colour, and a professional touch, making even a pretty ordinary tree look extraordinary.
The Art of a Perfectly Ribboned Christmas Tree
Ready to go beyond just draping a bit of ribbon here and there? If you want a Christmas tree that looks like it's been professionally styled, you're in the right place. This guide dives into the real techniques decorators use to add depth, texture, and a bit of magic to their festive designs.
We're skipping the generic advice. Instead, we'll share practical tips that work whether you love a rustic farmhouse look or a glamorous, sparkling theme. This is all about giving you the foundational skills to build a tree you'll be proud of, starting with the core concepts that will leave you feeling confident and inspired.
A Tradition with Royal Roots
Decorating with ribbons isn't just a modern trend; it's a practice with deep historical roots right here in the UK. The tradition actually traces back to Victorian times, when trees were decorated with sweets, candles, and small gifts hung from the branches.
This was all popularised by Queen Victoria and Prince Albert, who brought the German Christmas tree tradition to British households around 1840. A famous sketch of the royal family gathered around their decorated tree appeared in the Illustrated London News in 1848, cementing its place in British culture. You can discover more about the history of Christmas trees and their classic decorations.
Why Ribbons Make All the Difference
So, what is it about ribbon that makes it such a powerful decorating tool? It does a few key jobs that baubles alone just can't manage.
- Adds Movement and Flow: A well-placed ribbon guides your eye around the tree, creating a sense of motion and pulling the whole look together.
- Introduces Texture: From rich velvet to rustic burlap, ribbon brings a tactile element that adds real warmth and interest.
- Fills Gaps: Ribbon is fantastic for effortlessly concealing sparse areas in both real and artificial trees, making them appear much fuller than they are.
The secret to a designer-looking tree isn't just piling on more ornaments—it's the strategic use of ribbon. Think of it as the framework that ties your entire theme together, from the topper right down to the tree skirt.
Honestly, it’s best to view your ribbon as the unifying element in your design. It helps set the colour palette and style from the get-go, which makes choosing and placing all your other decorations so much easier.
Finding the Right Ribbon for Your Tree
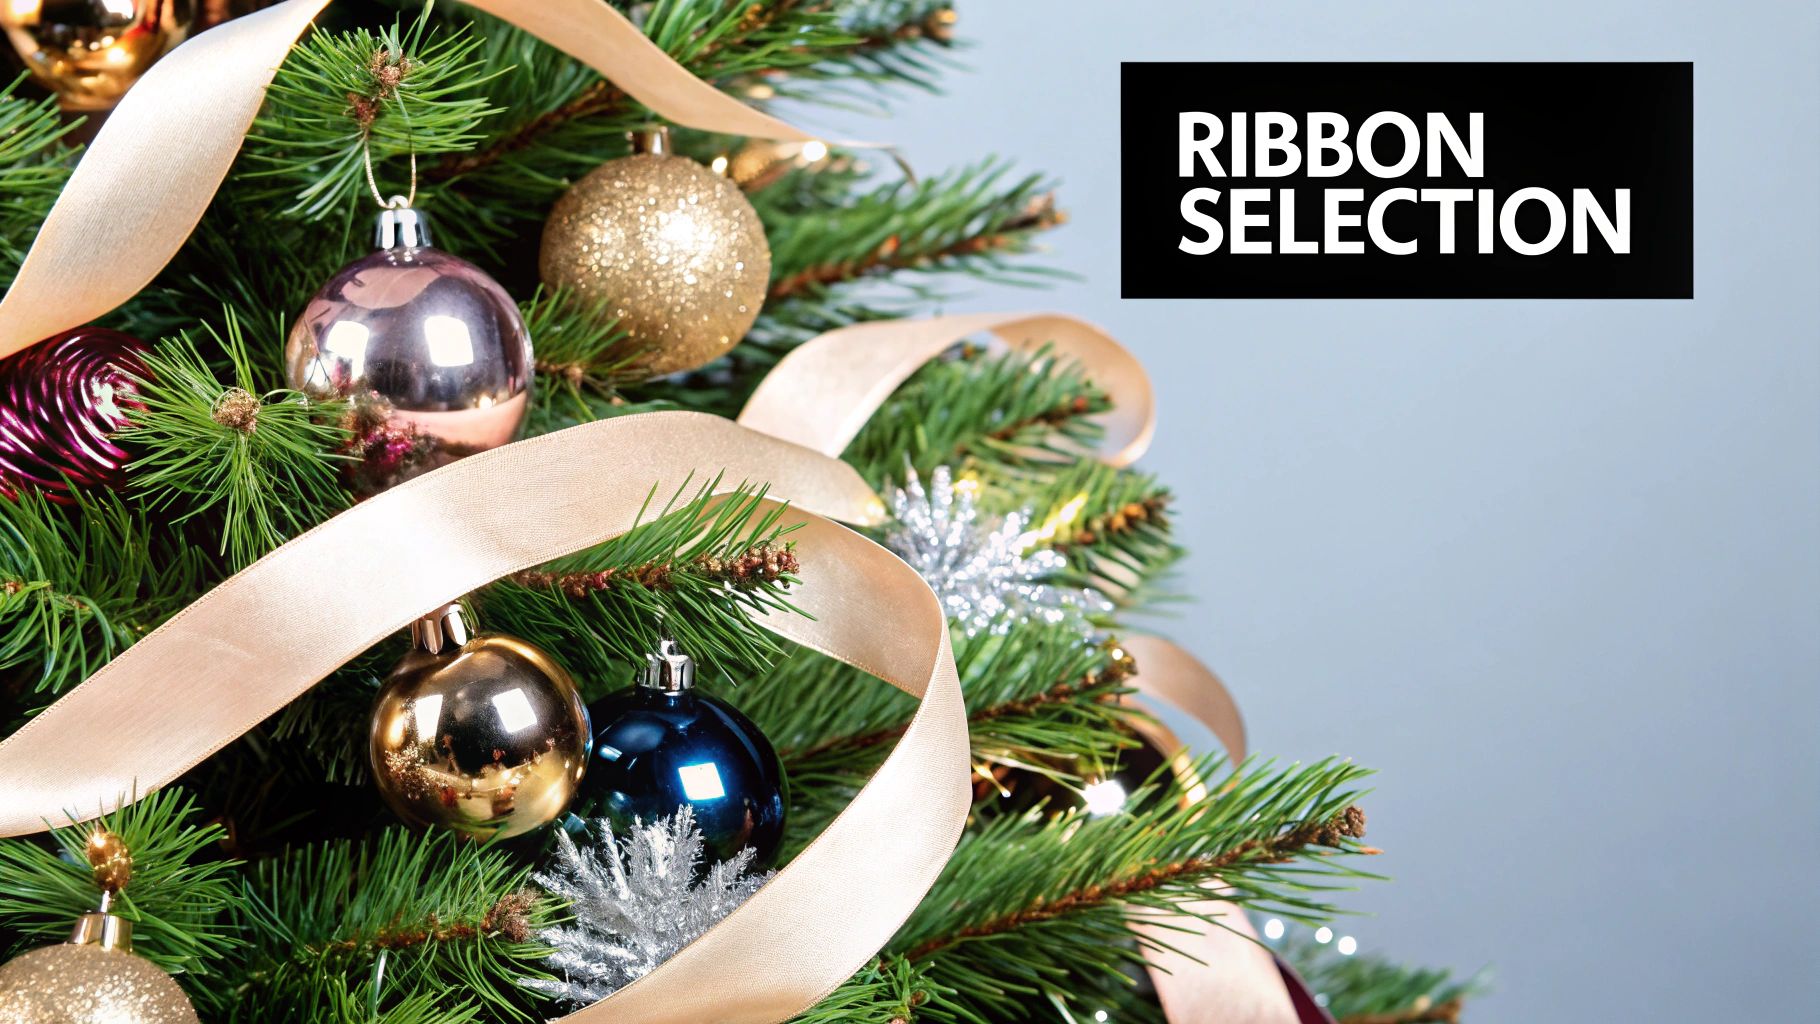
The ribbon you choose is so much more than just another decoration; it’s the very soul of your Christmas tree's design. It sets the colour palette, adds layers of texture, and guides your eye across the branches, pulling all the other elements together into one cohesive look. Get this part right, and the rest of the decorating process becomes a joy.
With a sea of options out there, from sumptuous velvets to rustic hessians, it can feel a little daunting. But the secret is simply to match your ribbon's style and material to the overall theme you're dreaming of for your Christmas tree.
What Are Your Ribbon Options?
Not all ribbons are created equal, especially when you’re asking them to hold a shape on a tree for a month. The material you pick will completely change the final effect, from the way it catches the fairy lights to the kind of bows and loops you can create.
For almost every decorating technique I’ve ever used, wired ribbon is non-negotiable. That fine wire stitched into the edges is the magic ingredient. It’s what lets you sculpt beautiful, full loops, create flowing cascades, and tie structured bows that won’t go limp and sad halfway through December. It puts you in complete control.
You can browse a fantastic collection of wired edged Christmas ribbons to find the perfect one for your tree this year.
Before you buy, it’s worth getting to know the most popular materials and what they bring to the table. Each one offers a different personality.
Choosing Your Christmas Ribbon Material
| Ribbon Type | Key Characteristics | Best For | Insider Tip |
|---|---|---|---|
| Velvet | Rich, plush texture that absorbs light. | Creating a warm, traditional, or vintage feel. | Its luxurious weight makes it perfect for grand, cascading waterfalls down the tree. |
| Satin | Smooth, glossy finish that reflects light. | Modern, glamorous, or elegant themes. | Double-sided satin is a great choice as both sides look equally beautiful if the ribbon twists. |
| Burlap/Hessian | Coarse, natural, and rustic weave. | Farmhouse, cottage, or woodland-inspired trees. | Pair it with natural elements like pinecones and wooden ornaments to complete the look. |
| Organza/Sheer | Lightweight, delicate, and shimmery. | Layering to add dimension and a touch of sparkle. | Use a wider, solid wired ribbon as a base and layer a narrower sheer ribbon on top for a designer touch. |
Think of your ribbon as the main character in your tree’s story. A wide, patterned wired ribbon makes a bold statement, while a delicate, sheer ribbon plays a more subtle, supporting role. Choose a lead that fits your script.
How Much Ribbon Do You Actually Need?
There is nothing more frustrating than getting halfway through weaving your ribbon perfectly, only to find you’re a few feet short. It’s a classic decorating disaster.
A good rule of thumb to start with is at least 3 metres (about 10 feet) of ribbon for every vertical foot of your tree.
So, for a standard 7ft tree, you’ll want a minimum of 21 metres (or roughly 70 feet). But honestly, that’s just a baseline. If you love a fuller, more dramatic style with lots of big loops and billows, you will need quite a bit more. I always recommend buying one extra roll just in case. It's much better to have a little left over for wrapping presents than to run out at a crucial moment.
This is especially true when you consider just how popular ribbon has become. With around 7 million real Christmas trees sold in the UK each year and 85% of homes putting up a tree, ribbons are a key ingredient for countless families aiming for that picture-perfect festive centrepiece.
Mastering Popular Ribbon Styling Techniques
Once you've chosen the perfect ribbon, it's time for the fun part: bringing your vision to life. This is where you transform a simple spool of fabric into a dynamic feature that gives your tree its unique personality. There are several professional techniques you can use, and each one creates a completely different feel.
We'll walk through three of the most popular and effective methods I've used over the years. Don't worry about getting it perfect on the first try; the beauty of a quality wired ribbon is that it’s incredibly forgiving and easy to adjust until you’re happy with the result.
The Classic Cascade Method
For a traditional and elegant look, the vertical cascade is a timeless choice. This technique guides the eye downwards in graceful lines, which has the brilliant effect of making your tree appear taller and more stately. It’s a fantastic method for showing off beautiful patterned or velvet ribbons.
Start right at the top of your tree, just beneath where your topper will eventually sit. The trick is to secure the end of your ribbon deep inside a branch. I do this by twisting a couple of the smaller branch tips around it, creating a strong, hidden anchor point.
Now, let the ribbon flow downwards. Instead of pulling it taut, which can look a bit stiff, allow it to drape naturally over the outer branches. This creates a gentle "billow" between your anchor points. Every foot or two, tuck the ribbon back into the tree and secure it to another branch. Keep doing this all the way down, creating several vertical streams of ribbon around the tree.
A common mistake I see is people simply laying the ribbon on the surface. For a professional look, you have to anchor your ribbon deep within the branches. It makes it seem as though the ribbon is organically woven into the tree, not just sitting on top.
The Horizontal Candy Cane Wrap
If you prefer a more structured and playful design, the horizontal wrap is a brilliant option. This style creates clean, defined bands of colour that encircle the tree, much like stripes on a candy cane. It works especially well on symmetrical, cone-shaped trees where you want that perfect, uniform look.
To get started, anchor your ribbon at the top just as you would for the cascade method. But instead of going down, you’ll work your way around the tree. Drape the ribbon in a gentle downward spiral, securing it to branches every couple of feet to maintain a consistent angle.
The key here is consistency. Try to keep the spacing between each wrap relatively even to create a balanced, rhythmic pattern. Don't be afraid to cut the ribbon after a few full rotations and start a new section. Honestly, it gives you much more control and stops the ribbon from getting tangled up.
This infographic can help you figure out how much ribbon you'll need before you start wrapping.
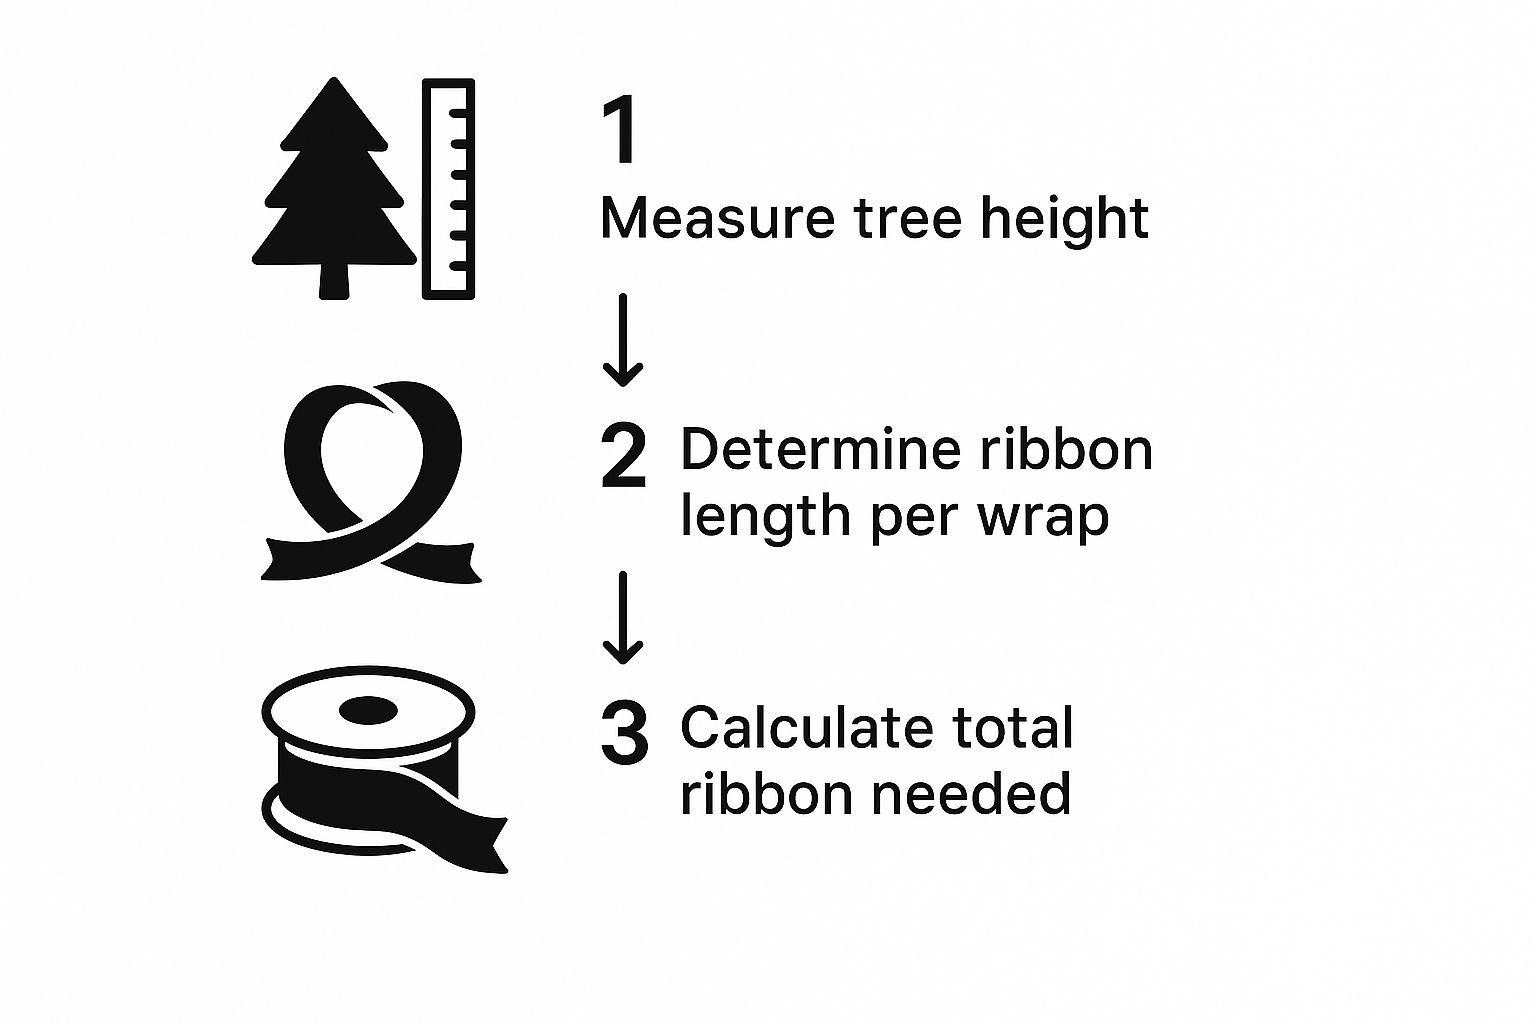
It’s a great visual guide that really simplifies the measurement process, ensuring you have enough material before you commit to this style.
The Tuck And Billow Technique
For a truly luxurious, full, and designer-level finish, the "tuck and billow" method is unmatched. This technique creates these wonderful, voluminous pockets of ribbon that fill gaps and add incredible depth. It’s my personal favourite for making a tree look incredibly lush and is particularly effective with wider wired ribbons.
Instead of creating continuous lines, you'll be working with shorter sections of ribbon, usually about 3 to 4 feet long.
- Tuck the Start: Take one end of your ribbon piece and push it deep into the tree, wrapping a branch tip around it to secure it firmly.
- Create the Billow: Let the ribbon puff outwards from the tree, creating a generous, loose loop or "billow." Don't flatten it!
- Tuck the End: Tuck the other end of that section back into the tree, maybe a foot or so away from your starting point, and secure it just like the first end.
You simply repeat this all over the tree, filling in spaces and creating a random, organic pattern of beautiful ribbon puffs. For added dimension, it's worth learning about the different types of wired ribbons that hold their shape best for this technique. The final effect is a tree that looks professionally styled, with ribbon peeking out from between the branches in an effortlessly chic way.
Creating a Showstopping Tree Topper Bow
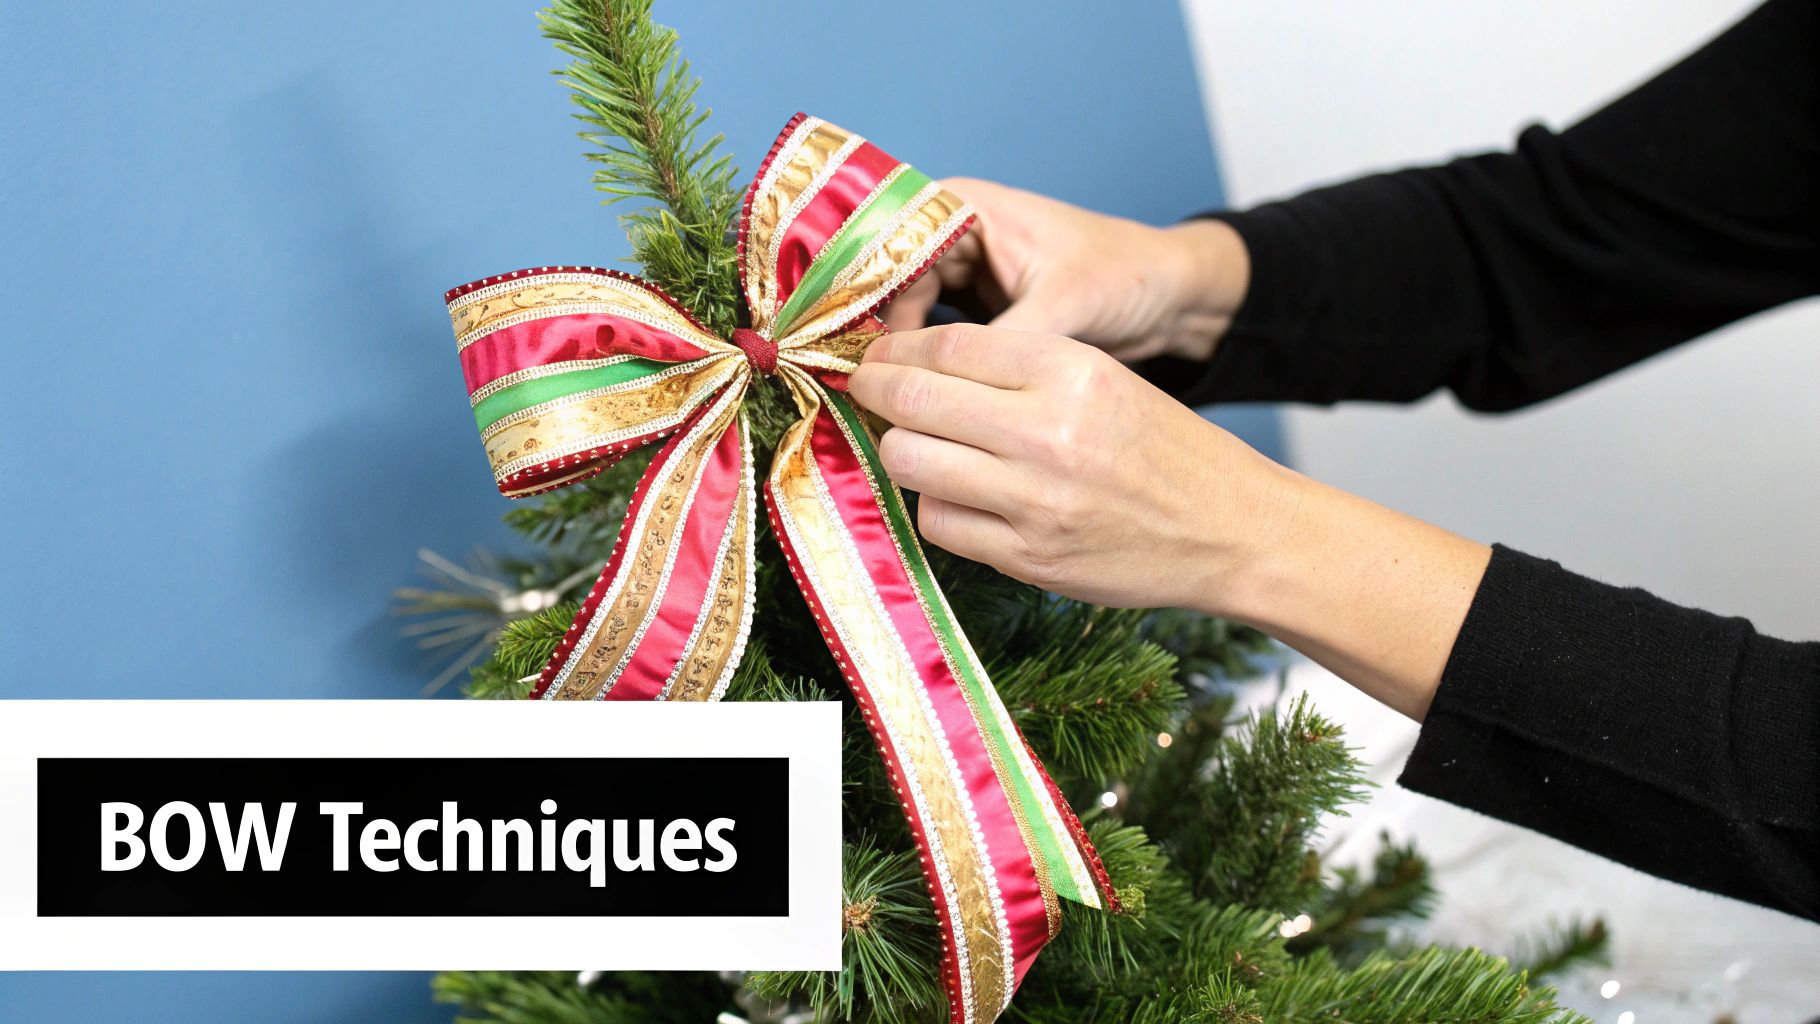
The bow on top of your tree is its crowning glory. It’s the final flourish that pulls your entire ribbon theme together, creating a beautiful focal point that draws the eye upwards.
Forget those small, sad-looking bows that come pre-made in a packet. Creating a large, voluminous topper is far easier than it looks and makes a world of difference to decorated Christmas trees with ribbons.
The secret to a professional-looking bow is all in the material. Just like the ribbons cascading down the tree, a wide, wired ribbon is your best friend here. Go for a width of at least 6 cm (about 2.5 inches), as this provides the structure needed to create big, full loops that won’t collapse over time. Anything narrower will simply get lost and struggle to make an impact from across the room.
Building Your Florist Bow
The "florist's bow" is a classic technique for a reason: it's simple, reliable, and delivers a stunning, multi-looped bow every single time. You don't need any special gadgets, just your ribbon, a pair of sharp scissors, and some thin floral wire.
First, decide how long you want the tails of your bow to hang. Unspool that length from your ribbon roll, and this will be your starting point. Now, just pinch the ribbon at that spot to mark it.
Next, it’s time to create your first loop. Fold the ribbon back over on itself to form a loop, then pinch it together at the base where your thumb is holding the starting point. The absolute key here is to twist the ribbon at the pinch point before you make the next loop. This simple twist ensures the "pretty" side of your ribbon is always facing outwards for every single loop you create.
Keep making loops of a similar size, alternating from side to side and twisting in the centre each time. For a really good-sized topper, you should aim for at least four to five loops on each side. Don't worry about perfection just yet; you'll fluff them all out later.
Securing and Shaping Your Masterpiece
Once you've got all your loops, it’s time to secure the bow. Tightly wrap a piece of floral wire around the centre where you've been pinching everything together. Twist the wire at the back several times to lock it in place, leaving the long ends free—you'll use these to attach the bow to the tree.
Now you can cut the bow free from the main ribbon roll, creating your second tail. For a polished finish, you'll want to trim the ends of your tails.
- A "V" cut (or fishtail): This creates a classic, decorative finish that looks incredibly smart.
- A diagonal cut: This offers a clean, modern, and simple look.
With the bow securely wired, you can start shaping. This is where the magic really happens. Gently pull and separate each loop, fluffing them outwards and arranging them into a full, rounded shape. The wire in the ribbon edges will hold whatever form you give them, so don't be shy!
Finally, use the long ends of your floral wire to attach the bow firmly to the topmost branch of your tree. Wrap the wire securely around the central stem to ensure it stays put as the magnificent focal point it deserves to be.
If you're looking for more inspiration, you can find a wonderful selection of professionally handmade bows to see different styles in action.
Layering Decorations for a Cohesive Look
A truly memorable Christmas tree is built in layers, with each element working together to create a stunning, cohesive look. Once your ribbon is perfectly placed, it acts as a beautiful road map for the rest of your decorations. Thoughtfully integrating your ornaments and other elements is what elevates a tree from being simply pretty to absolutely breathtaking.
The key is to follow a tried-and-tested order that professional decorators have relied on for decades. This simple sequence ensures every component gets its moment to shine without getting in the way of the next step. It might sound basic, but sticking to this order makes the entire process smoother and the final result far more polished.
The Professional Order of Decorating
There’s a good reason decorators don't just throw everything on the tree at once. The proper sequence allows you to build depth from the inside out, creating a rich, textured display that draws you in.
-
Lights First, Always: Before a single bauble or ribbon goes on, get your lights sorted. This is non-negotiable! It ensures they can be woven deep among the branches, creating that magical glow from within. Adding them later means a frustrating battle with ribbons and ornaments.
-
Ribbons Second: With the lights in place, the ribbon comes next. This allows you to establish the main visual flow of your design—be it vertical, horizontal, or billowing—across a relatively blank canvas. Your ribbon sets the stage for everything that follows.
-
Ornaments and Baubles Last: Finally, it's time for the baubles, ornaments, and decorative picks. Placing these last means you can nestle them perfectly into the gaps left by the ribbon, ensuring a full, balanced appearance without any awkward empty spots.
Adding Dimension with Multiple Ribbons
One of my favourite techniques for achieving a high-end, designer look is to layer two different types of ribbon. It’s a simple change that adds incredible texture and visual interest. The trick is to pair contrasting styles for maximum impact.
For example, you could start with a wide, patterned wired ribbon—perhaps a bold tartan or a glittery snowflake design—as your main layer. Then, weave a second, narrower ribbon, like a simple metallic gold or a sheer organza, right alongside it. This combination adds a subtle sparkle and sophistication that makes the whole design feel much more intentional and luxurious.
Don't be afraid to mix textures. Pairing a rustic burlap ribbon with a delicate, shimmery gold one can create a stunning 'rustic glam' effect that feels both cosy and elegant. It’s all about creating that beautiful contrast.
Using Ribbon to Fill Gaps
Even the most beautiful trees can have sparse areas or little gaps. This is where your leftover ribbon becomes your secret weapon. Instead of trying to stretch your main ribbon design to cover every single hole, you can use smaller pieces to create 'fillers'.
Just cut short lengths of ribbon (6-8 inches) and tie simple bows or knots directly onto the branches in those emptier spots. Another great trick is to create small, single "billows" by tucking both ends of a short piece deep into the tree. This simple technique makes your tree look incredibly full and lush, ensuring it looks absolutely stunning from every single angle.
Got Questions About Tree Ribbons? We've Got Answers
Even after years of decorating trees, a few questions always seem to crop up. Getting these little details right is what separates a pretty tree from a truly stunning one. Let's tackle some of the most common queries I hear, so you can feel completely confident as you start decorating.
These are the questions that come up time and time again, and the answers are all based on my own hands-on experience with countless trees of all shapes and sizes.
How Much Ribbon Do I Need For a 7ft Christmas Tree?
For a standard 7ft Christmas tree, a good rule of thumb is to have at least 3 metres of ribbon for every vertical foot of the tree. That means you'll want to start with a minimum of 21 metres (that's about 70 feet).
Now, that's just a baseline. If you're aiming for that really lavish, full 'Tuck and Billow' style with big, deep loops, you will definitely need more.
My best piece of advice? Always, always buy one extra roll of ribbon. There is nothing more frustrating than running out halfway through, and any leftovers are perfect for wrapping presents or creating a matching bow for your door. It’s a simple way to make your entire festive theme feel perfectly coordinated.
Should I Use Wired or Non-Wired Ribbon?
For almost every single application on a Christmas tree, I wholeheartedly recommend wired ribbon. The fine wire sewn into the edges is an absolute game-changer. It’s what allows you to sculpt those beautiful, full loops, create flowing cascades, and tie structured bows that hold their shape all season long.
Non-wired ribbon, while lovely for other crafts, just doesn't have the oomph. It tends to droop and go flat on a tree, losing its shape almost immediately. It might be okay for tying tiny, simple bows right onto the tips of branches, but it simply lacks the structure you need for your main ribbon design. If you want that full, professional finish, wired is the only way to go.
What Is the Correct Order to Decorate a Tree?
Yes, there is a professional order of operations! Following it will give you a balanced, layered, and polished result every single time. It also helps you avoid getting everything into a tangled mess, making the whole process much more enjoyable.
- Lights First: Always start with your lights. This lets you weave them deep into the branches, creating a gorgeous glow from within that will backlight all your decorations.
- Ribbons and Garlands Second: Once the lights are on, it’s ribbon time. Placing it now allows you to establish the core design and the visual flow of the tree before any ornaments get in your way.
- Ornaments and Baubles Last: Finally, fill in the tree with your baubles and other hanging decorations. You can strategically place them in the spaces around your ribbon, filling any gaps for that complete, cohesive look.
At Ribbons4u Ltd, we stock an extensive range of high-quality wired Christmas ribbons to help you create a stunning tree this year. You can explore our full collection at https://ribbonsforyou.com.


 Facebook
 Twitter
 Pinterest