7 Fresh Craft Show Display Ideas to Elevate Your Booth
The UK craft show scene is more vibrant and competitive than ever. For artisans and makers, a successful day isn't just about beautiful products; it's about creating an experience that draws customers in and tells your brand's story. A well-organised and visually stunning booth can be the difference between a casual browser and a loyal customer.
Forget generic shelves and plain tablecloths. We're delving into seven actionable craft show display ideas designed to elevate your setup, create an immersive environment, and ultimately, boost your sales. This guide moves beyond the basics to explore practical strategies for a truly memorable stall.
You will learn how to implement everything from dynamic vertical systems and interactive demo stations to comprehensive themed environments that capture your brand's essence. We will cover specific techniques for lighting, portability, and even customer engagement. A special focus will be placed on how small, professional details, like using bespoke printed ribbons to package sales or accent displays, can provide a sophisticated, finishing touch. Let's get organised and build a display that truly showcases the quality of your craft and turns footfall into sales.
1. Master Verticality with Tiered Display Systems
One of the most effective craft show display ideas for maximising a limited footprint is to think upwards. Instead of spreading your products across a flat table, creating a cluttered and overwhelming view, a tiered display system draws the customer's eye vertically through your collection. This approach creates instant visual interest, making your booth look professional, organised, and far more engaging than a single-level setup.
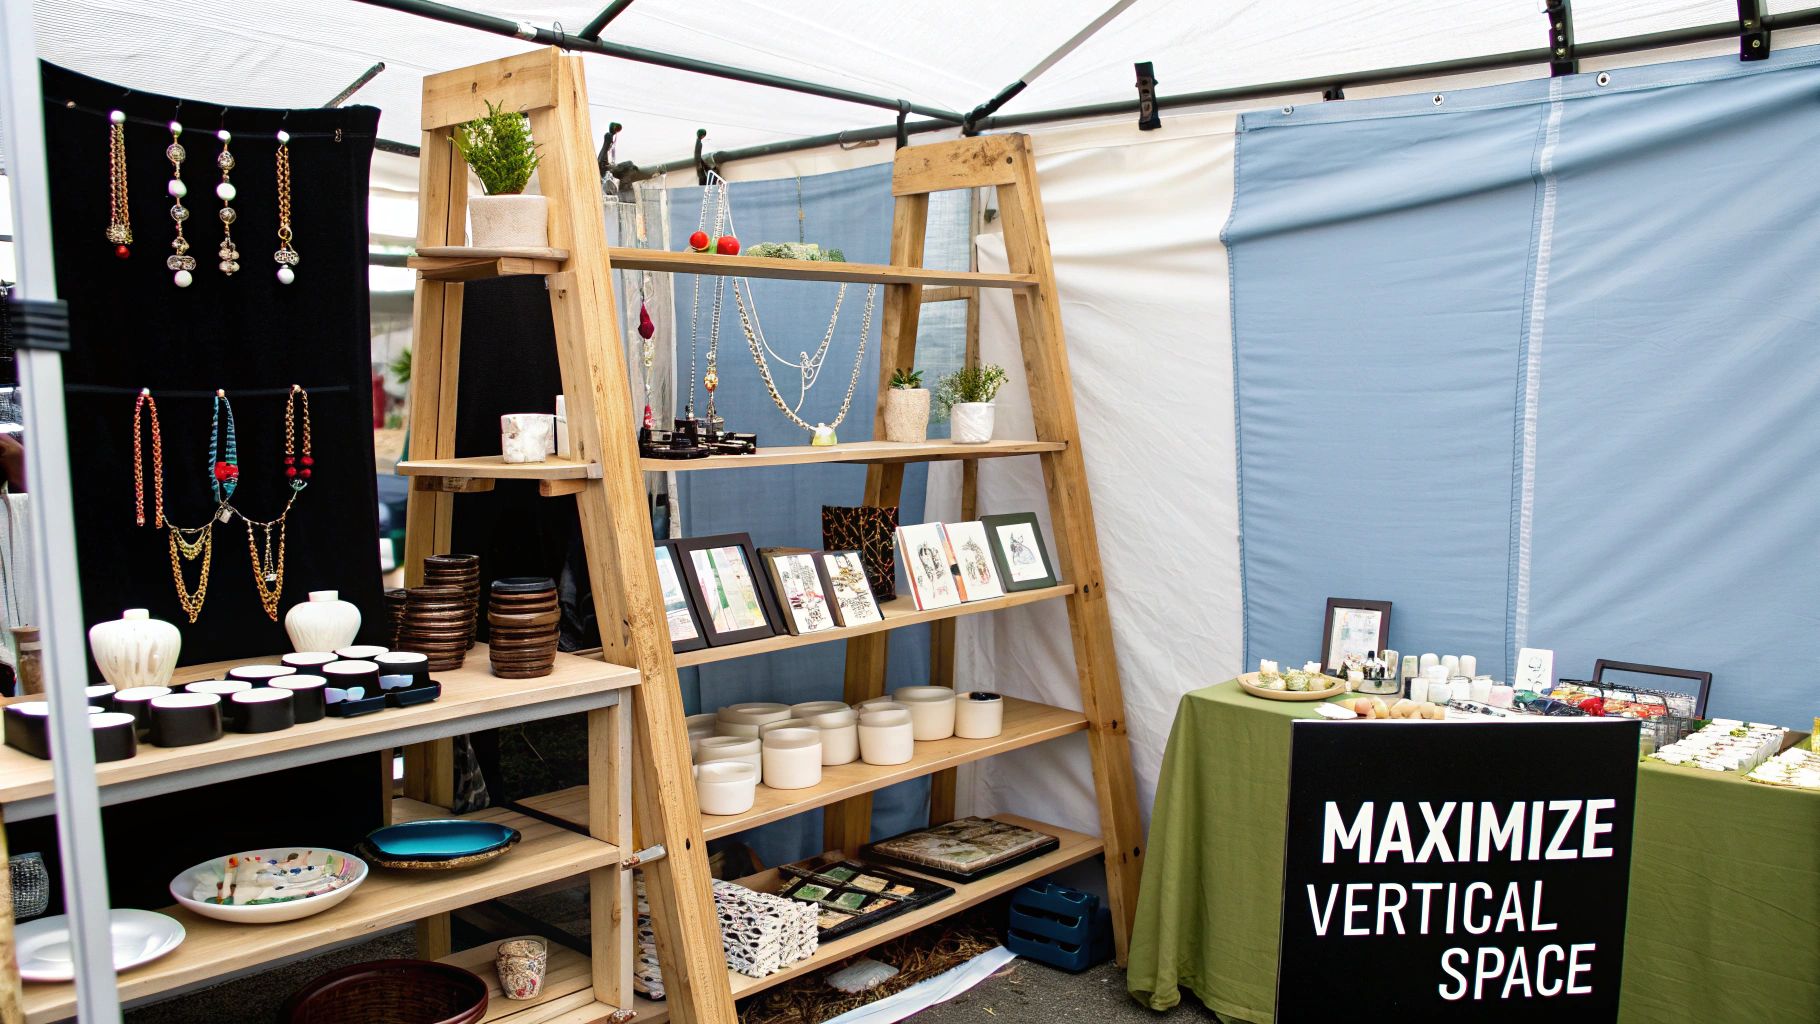
Vertical displays allow you to showcase significantly more stock without sacrificing clarity. For crafters with smaller items like jewellery, candles, or soaps, this technique is a game-changer. It ensures every piece is visible and accessible, preventing your best work from getting lost in a jumble.
How to Implement Tiered Displays
There are countless ways to build height into your booth. The key is to choose a method that aligns with your brand’s aesthetic and product type.
- Jewellery Makers: Use tiered acrylic or wooden stands to elegantly hang necklaces and bracelets at different heights. Small busts or T-bar stands can create a boutique feel.
- Artists & Printmakers: Display prints on tall, freestanding grid-wall panels or use a leaning A-frame ladder to hang framed pieces.
- Pottery & Ceramics: Arrange your work on a set of nested wooden crates or sturdy, custom-built shelving units to create a rustic, gallery-like effect.
- Textile Crafters: Repurpose a vintage ladder to beautifully drape quilts, blankets, or scarves, showcasing their full length and design.
Key Insight: A vertical display does more than save space; it guides the customer on a visual journey. By placing your most eye-catching items at eye level, you can strategically direct attention and encourage closer inspection of your entire range.
Actionable Tips for Success
To ensure your vertical display is both beautiful and functional, keep these points in mind:
- Prioritise Stability: Place your heaviest and largest items on the lowest, most stable levels. For outdoor events, always secure your display with weights or anchors to prevent it from toppling in a breeze.
- Create Visual Rhythm: Use an odd number of levels, such as three or five, as this is often more aesthetically pleasing and dynamic to the human eye.
- Allow for Breathing Room: Avoid cramming items together. Leaving a small amount of negative space around each product makes the display feel less cluttered and more high-end.
- Practise at Home: Always do a full trial run of your setup before the event. This allows you to identify any stability issues, adjust spacing, and perfect your layout, saving you precious time and stress on the day of the show.
2. Create Buzz with Interactive Demo Stations
Beyond a static display, one of the most powerful craft show display ideas is to bring your creative process to life. An interactive demo station transforms your booth from a simple point of sale into a captivating live experience. By actively making your products on-site, you not only showcase your skill and the quality of your work but also create an unforgettable memory for potential customers, drawing a crowd and fostering genuine connections.
This approach offers an authentic look behind the curtain, answering customers' unspoken questions about how your items are made. It adds immense value, justifies your pricing, and turns passive browsers into engaged fans. For artisans whose craft involves a fascinating process, a live demonstration is an unparalleled marketing tool.
How to Implement a Demo Station
Your demonstration should be compelling but manageable within a craft show environment. The key is to choose a part of your process that is visually interesting and safe for a public setting.
- Pottery & Ceramics: Set up a small, portable pottery wheel for throwing demonstrations. Even simple tasks like trimming or carving details on greenware can be mesmerising.
- Jewellery Makers: Demonstrate wire-wrapping techniques, stone setting, or metal stamping. Please note, open-flame work like torch soldering is often prohibited and requires special permission and safety measures.
- Woodworkers: Safely demonstrate hand-carving small items, sanding techniques, or applying a final finish to a piece.
- Textile Artists: Use a small portable loom for weaving, demonstrate hand-spinning yarn, or show the process of block printing onto fabric.
Key Insight: A live demonstration acts as 'retailtainment'. It entertains and educates simultaneously, building trust and a personal story around your products that customers will remember and share long after the event.
Actionable Tips for Success
To ensure your demo station is a hit and not a hindrance, careful planning is essential:
- Prioritise Safety: This is non-negotiable. Ensure any tools are used safely and that your setup creates a clear barrier between your workspace and the public. Check the event’s regulations beforehand.
- Prepare in Batches: Have materials prepped and ready for different stages of the demonstration. This keeps the process flowing smoothly without long, boring pauses.
- Engage Verbally: Don't just work in silence. Talk to the crowd, explain what you are doing, share fun facts about your craft, and invite questions. This interaction is what builds relationships.
- Showcase Finished Examples: Keep completed versions of the item you are demonstrating close by. This allows customers to see the beautiful end result and make an immediate purchase.
3. Create a Themed Booth Environment
To truly stand out in a crowded craft show, move beyond simple product displays and create a fully immersive themed environment. This powerful strategy involves designing your entire booth to transport customers into a specific world, mood, or aesthetic that deeply resonates with your brand. An effective theme makes your space a memorable destination, not just another stall, encouraging shoppers to stay longer and connect with your story.
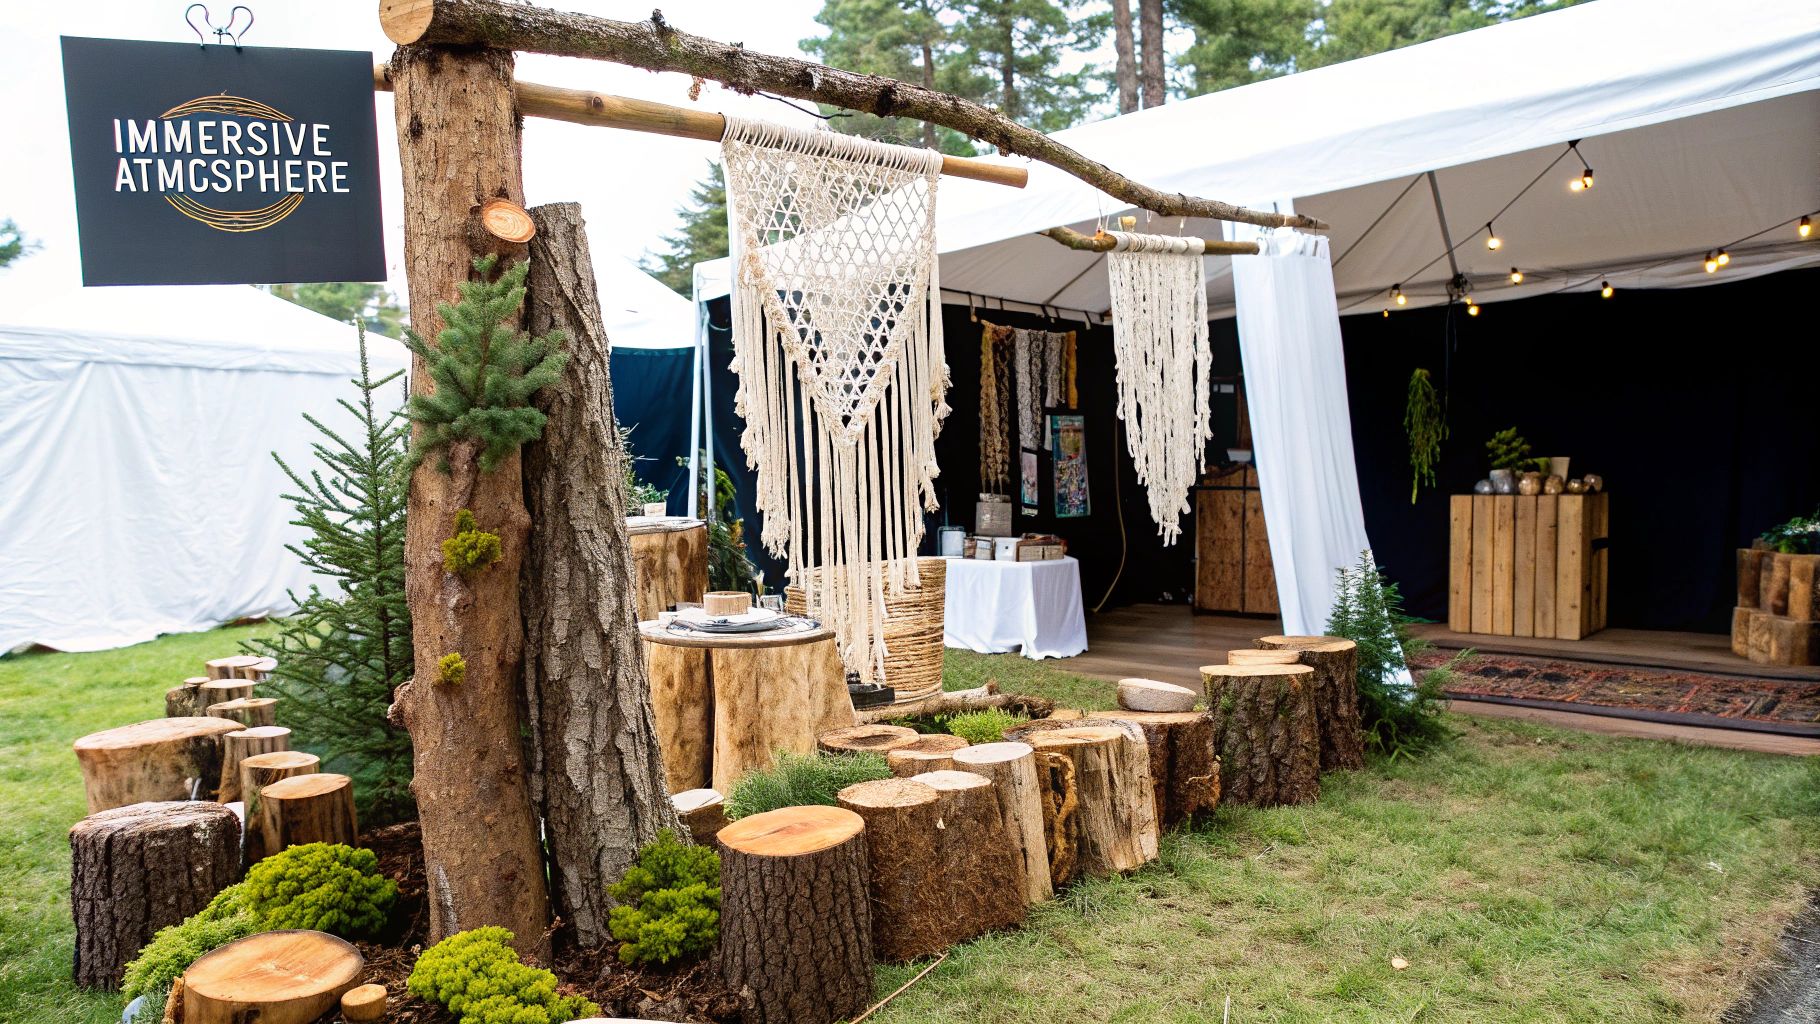
A cohesive theme turns your booth into a powerful branding tool. Whether you evoke a charming vintage kitchen or a serene woodland escape, the environment adds perceived value to your products. This is one of the most effective craft show display ideas because it creates an experience, helping customers to visualise your items in their own lives.
How to Implement a Themed Environment
The key to a successful theme is consistency across every element of your booth, from the largest backdrop to the smallest price tag.
- For Rustic or Natural Products: Create a woodland theme using real moss, birch logs for shelving, and a natural-coloured linen tablecloth. Use twine and kraft paper for your packaging and signage.
- For Vintage-Inspired Goods: Source antique furniture like a small dresser or vanity from a charity shop to display your items. Use lace doilies, vintage suitcases, and floral fabrics to enhance the nostalgic feel.
- For Modern & Minimalist Designs: Stick to a strict colour palette like monochrome or neutrals. Use clean lines, metal grid-walls, and acrylic risers to create a sleek, gallery-like atmosphere.
- For Bohemian Crafters: Hang macrame or tapestries as a backdrop, use plenty of houseplants (real or faux), and layer textured rugs on the floor.
Key Insight: A themed environment isn't just decoration; it's a form of storytelling. It communicates your brand's personality and values before a customer even touches a product, building an instant emotional connection.
Actionable Tips for Success
To create an immersive theme without it becoming overwhelming, follow these guidelines:
- Start with a Clear Vision: Create a mood board with colours, textures, and prop ideas. This ensures every choice you make is cohesive and supports the central theme.
- Prioritise Product Visibility: Your theme should enhance your products, not overshadow them. Ensure your items remain the focal point against your themed backdrop.
- Use All Senses: Think beyond visuals. Could you use a subtle scent diffuser that matches your theme (like cedar for a rustic booth) or play quiet, ambient music?
- Incorporate Your Branding: Make sure your logo, business cards, and even your attire align with the theme. This level of detail makes your brand appear polished and professional.
4. Portable Tent and Canopy Systems
For any crafter venturing into outdoor markets, a high-quality portable tent or canopy system is an absolute necessity. Far more than just a shelter from sun or rain, your tent is the foundation of your entire booth. It acts as a professional, branded frame for your products, defining your space and creating an inviting environment that draws customers in from across the fairground.
Modern pop-up structures have evolved significantly, offering robust protection while serving as a powerful display tool. A good canopy system is one of the most fundamental craft show display ideas because it establishes your presence and provides a blank canvas for your branding and layout, ensuring your stall looks polished and professional, regardless of the weather.
Investing in a professional-grade tent from brands like EZ-Up or Caravan Canopy provides a reliable and customisable space. These systems are designed for quick setup and durability, making them an essential part of any serious crafter's toolkit.
How to Implement Tent and Canopy Systems
Your tent is the first impression customers will have of your brand, so it's crucial to choose and accessorise it wisely.
- Custom Printing: Invest in a canopy top printed with your business name and logo. This instantly transforms your tent from a generic shelter into a branded storefront.
- Sidewall Integration: Use sidewalls to create a more enclosed, boutique-like atmosphere. They offer protection from wind and sun while providing valuable vertical space for hanging lightweight items like prints, textiles, or signage.
- Integrated Features: Look for modern systems from brands like ABCCanopy that offer attachments for shelving or display grids, allowing you to build your product displays directly into the structure of your tent.
- Colour Coordination: Choose a canopy colour that complements your products and branding. A neutral colour like white or grey makes your colourful products pop, while a bold brand colour can make you stand out in a crowd.
Key Insight: A tent isn't just for protection; it's the architectural anchor of your display. A well-chosen and branded canopy system signals professionalism and permanence, encouraging customers to take your work more seriously and spend more time browsing your products.
Actionable Tips for Success
To get the most out of your tent, focus on safety, stability, and aesthetics.
- Always Use Weights: Never rely on stakes alone, especially on hard surfaces. Invest in a set of heavy-duty canopy weights (at least 18kg or 40lbs per leg) to anchor your tent securely and prevent accidents in windy conditions.
- Practise Makes Perfect: Do a full trial run of setting up and taking down your tent at home before your first show. This will help you become familiar with the mechanism and save you from a stressful setup on the day.
- Register Your Warranty: Professional-grade canopies often come with a manufacturer's warranty. Be sure to register your purchase to protect your investment against defects or damage.
- Accessorise with Purpose: Your canopy can be more than a simple cover. Explore different ways to hang decorative elements from the frame, such as with elegant ribbons. Find inspiration by reading about ribbon canopies.
5. Lighting Enhancement Systems
Never underestimate the power of good lighting; it is one of the most critical craft show display ideas for making your products truly shine. Many indoor venues have inconsistent or poor overhead lighting, and outdoor shows can be affected by weather or tent shadows. Strategic lighting ensures your work is perfectly illuminated, drawing customers in and allowing them to appreciate the fine details, textures, and colours of your craft. It creates a warm, professional, and inviting atmosphere that sets your booth apart.
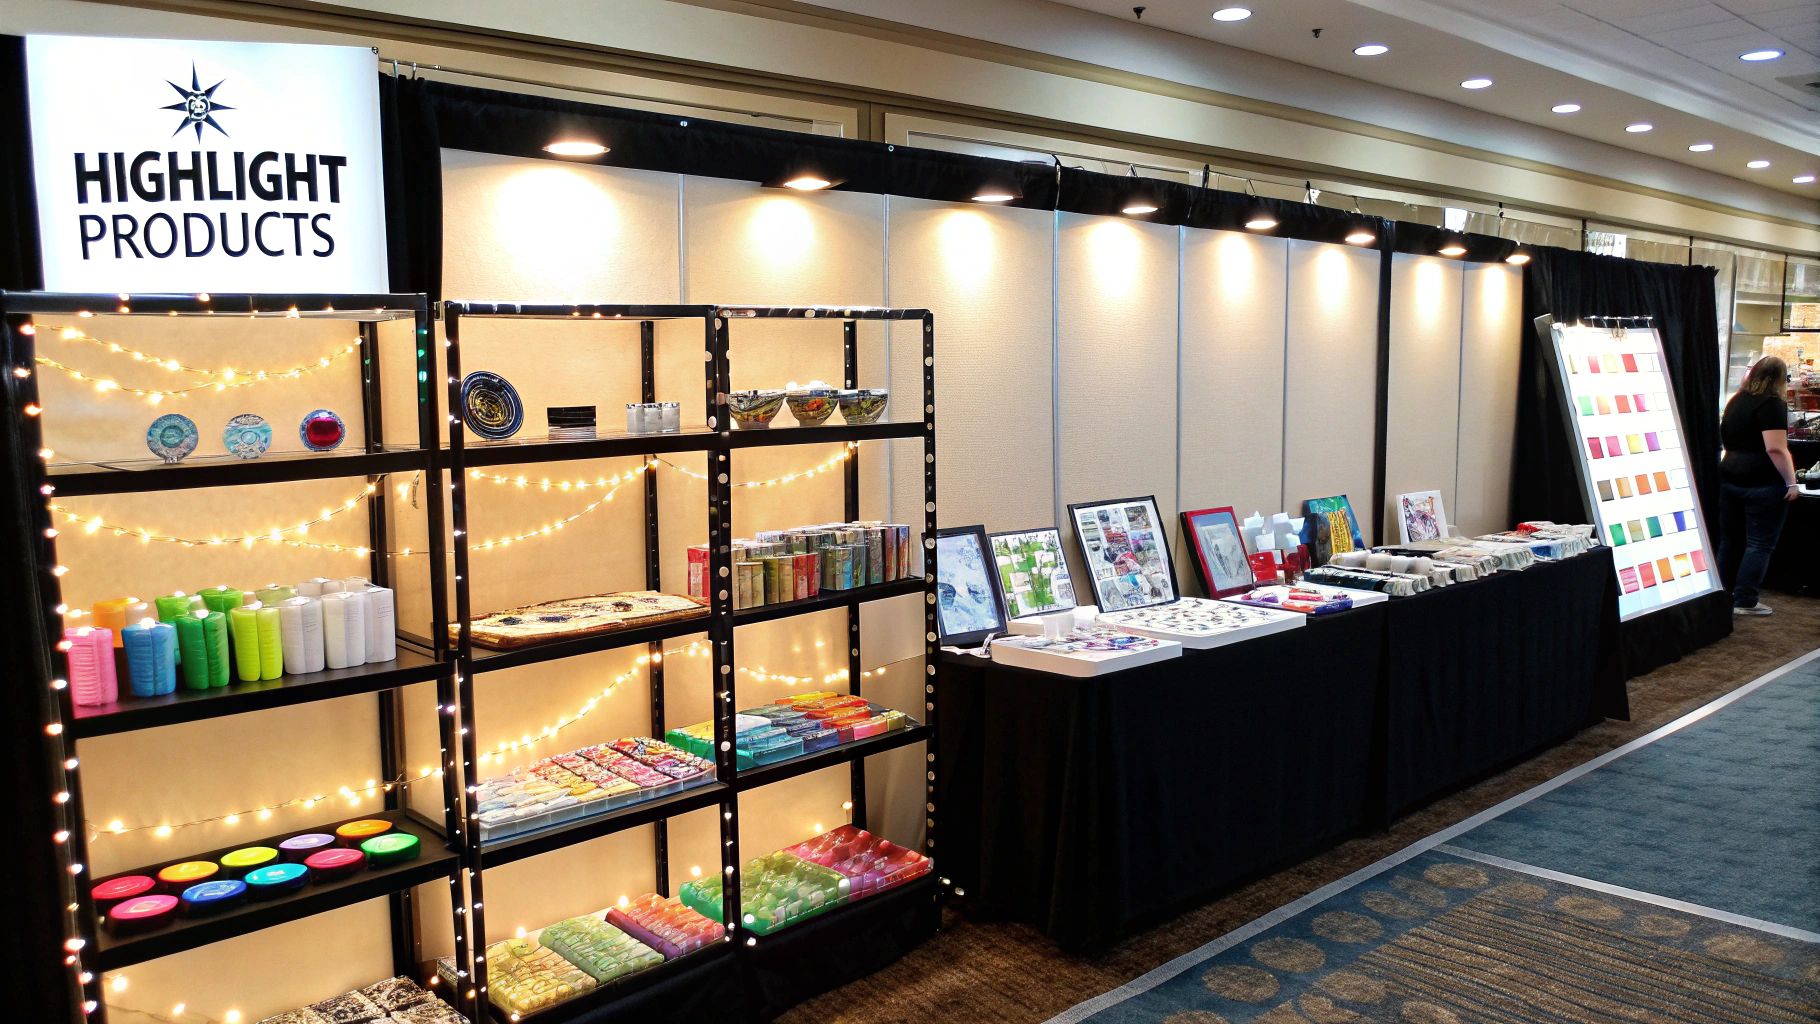
A well-planned lighting system can transform a standard display into a captivating showcase. It highlights your premier pieces, eliminates unflattering shadows, and ensures your booth is just as visible at the end of the day as it was at the beginning. For crafters selling items with intricate details like jewellery or delicate artwork, proper lighting isn’t just an enhancement; it’s essential for sales.
How to Implement Lighting Enhancement Systems
The right lighting solution depends on your product, power availability, and overall brand aesthetic. The goal is to add brightness and focus without creating harsh glares or distracting wires.
- Jewellery & Small Crafts: Use targeted LED spotlights to make gemstones and metals sparkle. Clip-on lights attached to shelving or displays can illuminate specific items with precision.
- Artwork & Prints: Position directional track lighting or picture lights above your pieces to ensure even, gallery-quality illumination that showcases true colours without creating a glare.
- Textiles & Clothing: Soft, warm LED strip lights tucked underneath shelves or along the top of a clothing rack can add a gentle glow that highlights texture and design.
- General Ambiance: Weave battery-powered fairy lights or string lights around your display for a whimsical, welcoming feel that attracts shoppers from afar.
Key Insight: Strategic lighting does more than just brighten your space; it directs a customer's gaze. Use focused beams to create focal points on your hero products, guiding shoppers to exactly what you want them to see first.
Actionable Tips for Success
To get the most out of your lighting, meticulous planning is crucial.
- Choose the Right Colour Temperature: For most crafts, a warm white light (around 2700K-3000K) is flattering and creates a cosy atmosphere. A neutral white (around 4000K) is better for accurately representing the colours in artwork.
- Plan for Power: Always check with the event organiser about electricity access. If none is available, invest in high-quality, long-lasting battery-powered lights and bring fully charged backups.
- Conceal Cords: Use tape, clips, or zip ties to neatly hide all wires and cables. A tidy setup looks more professional and prevents tripping hazards.
- Test Your Setup: Always do a full lighting test at home. This helps you identify where shadows fall and adjust the position of your lights for the best possible effect on show day.
6. Create Interactive Product Testing Areas
Moving beyond a purely visual display, one of the most powerful craft show display ideas is to invite customers to engage with your products directly. An interactive testing area transforms passive browsing into an active, memorable experience. By creating a designated space where shoppers can touch, try on, or test your items, you build trust, demonstrate quality, and give them the confidence they need to make a purchase.
This hands-on approach is incredibly effective for products whose value is best appreciated through touch, smell, or use. It removes the guesswork for the customer and creates a natural opportunity for you to connect with them, explain your craft, and answer questions. A positive testing experience can be the single factor that converts a curious browser into a loyal customer.
How to Implement Interactive Displays
Tailor your testing station to your specific products, ensuring it is both inviting and practical. The goal is to make the experience seamless and enjoyable for the customer.
- Skincare & Cosmetics: Set up a small, elegant station with a mirror, cotton pads, and clearly labelled "tester" versions of your lotions, balms, or soaps. Always include hand sanitiser.
- Textiles & Clothing: Encourage customers to feel the quality of your fabrics. Drape scarves over a mannequin so they can be tried on, or have a small pile of fabric swatches for items like blankets or cushions.
- Jewellery Designers: Provide a well-lit mirror and a padded surface where customers can comfortably try on rings, necklaces, and bracelets.
- Artisanal Food & Drink: If permitted by the event organisers, offer small, single-serving samples. Use disposable, eco-friendly cups or cocktail sticks to maintain hygiene.
Key Insight: An interactive station does more than just sell a product; it sells an experience. When a customer can feel the softness of a hand-knitted scarf or smell the unique fragrance of a handmade candle, they form an emotional connection to the item that a simple visual display cannot replicate.
Actionable Tips for Success
To ensure your testing area is a success and not a source of chaos, planning is essential.
- Prioritise Hygiene: This is non-negotiable. Have hand sanitiser, wet wipes, and a small bin readily available. Regularly clean the testing area and replace samples throughout the day.
- Clearly Label Everything: Use clear, professional signage to mark which items are testers. This prevents customers from accidentally opening new stock and avoids confusion.
- Monitor and Engage: Keep an eye on the area to assist customers and tidy up. Use this as a chance to talk about your ingredients, materials, or creative process.
- Protect Your Stock: Position your testing area strategically so you can supervise it easily, preventing potential theft or misuse of sample products.
7. Mobile Display Cart Systems
For crafters who frequently attend multiple shows, a mobile display cart system is one of the most practical and efficient craft show display ideas available. These portable, wheeled units combine transport and display into a single, cohesive solution, dramatically reducing setup and breakdown times. Instead of unloading countless separate boxes, you can simply roll your pre-arranged display into place, make a few final adjustments, and be ready for customers in minutes.
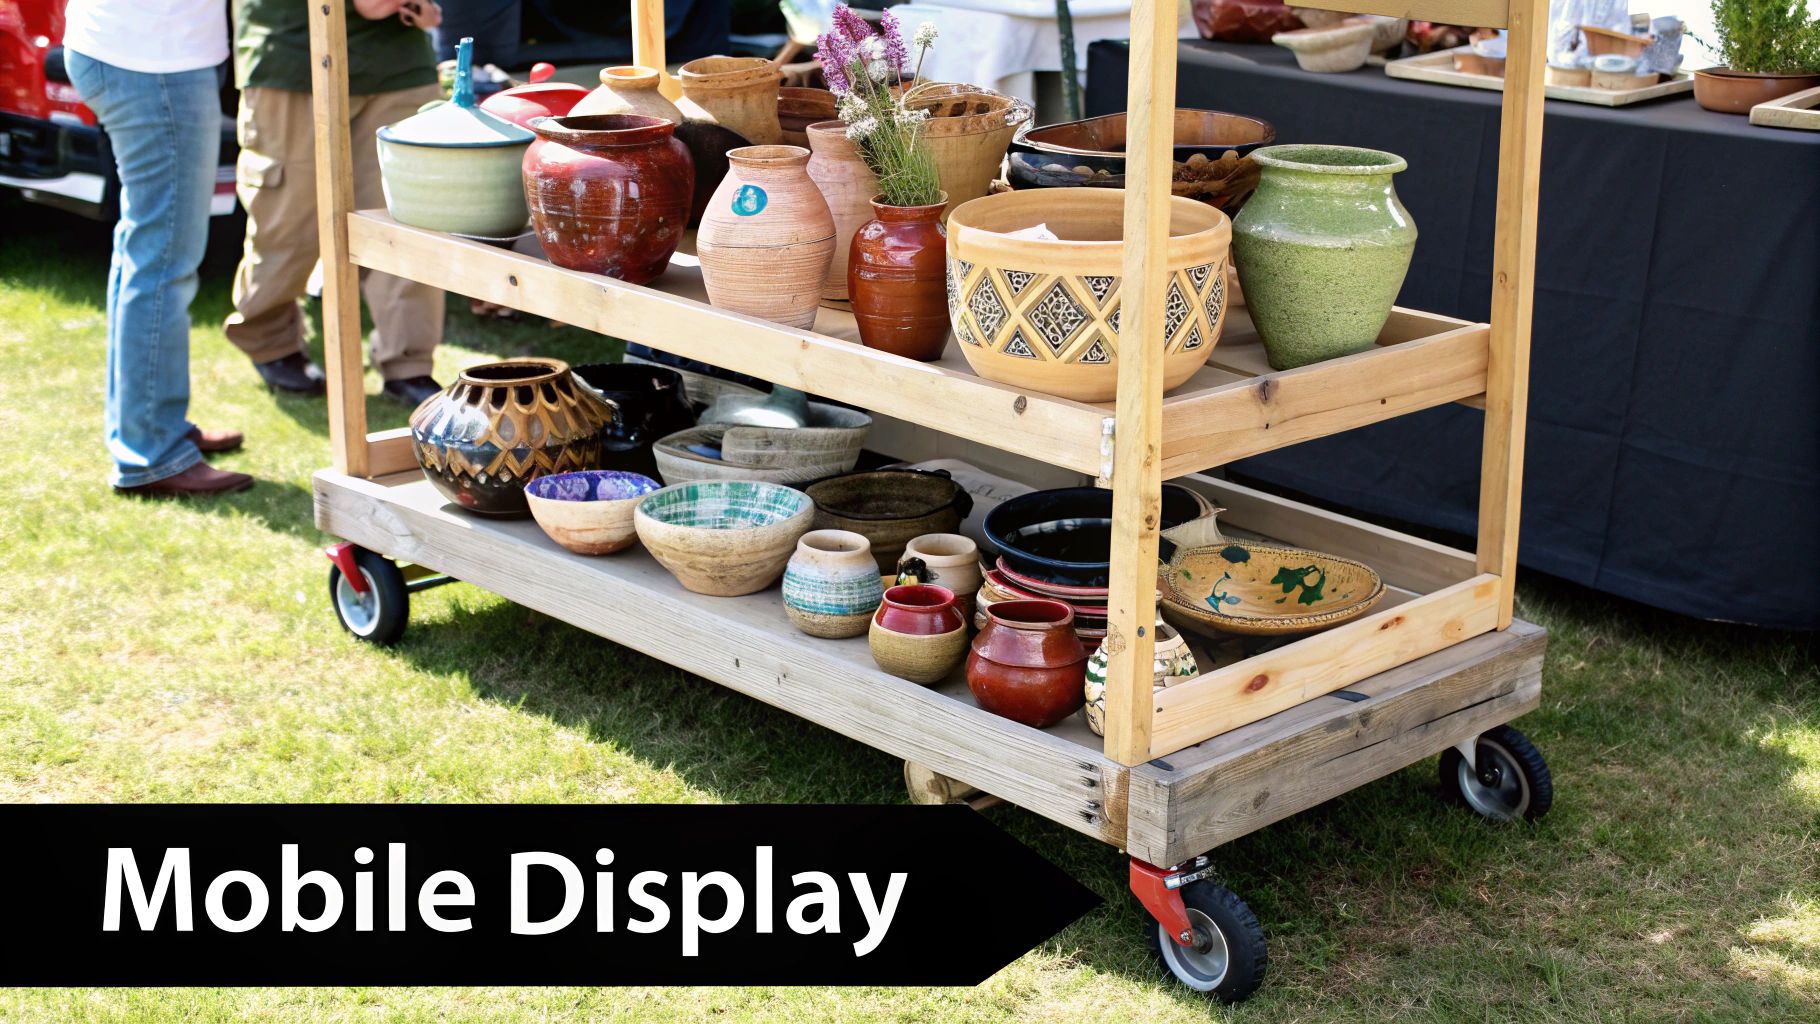
This approach offers incredible flexibility, allowing you to easily reconfigure your booth layout to suit different spaces or test new arrangements on the fly. A mobile cart is not just a piece of equipment; it's a strategic asset that streamlines your entire market day experience, saving you valuable energy and time.
How to Implement Mobile Display Cart Systems
Choosing the right cart depends heavily on your product type and brand aesthetic. The goal is to find a unit that is both functional for transport and stylish as a display.
- Jewellery Makers: A rolling display case with a glass top and lockable drawers offers security and a professional, boutique-like presentation.
- Artists & Printmakers: Look for mobile portfolio stands or A-frame carts with built-in slots to hold and display matted or framed prints safely.
- Pottery & Ceramics: Sturdy, multi-tiered metal or wooden utility carts with deep shelves prevent pieces from shifting during movement.
- Small Goods Crafters: A vintage bar cart or a tiered kitchen trolley can be a chic and effective way to showcase items like candles, cosmetics, or gourmet food products.
Key Insight: A mobile display cart streamlines your process from the moment you leave home to the moment you pack up. By minimising physical labour and setup stress, it allows you to conserve your energy for what truly matters: engaging with customers and selling your work.
Actionable Tips for Success
To get the most out of your mobile display system, focus on stability and security.
- Invest in Quality Wheels: Opt for large, durable wheels, preferably with a rubberised coating. These will handle uneven surfaces like grass or cracked paving much better than small, plastic castors.
- Prioritise Locking Mechanisms: Ensure at least two of the wheels have reliable locking mechanisms to keep your display firmly in place once positioned.
- Secure Your Stock: During transport, use bungee cords, straps, or custom-fit inserts to prevent items from shifting, rattling, or breaking.
- Plan for Uneven Ground: For outdoor events, bring small wooden shims or levelling blocks to place under the wheels to ensure your cart is stable and perfectly level.
Craft Show Display Ideas Comparison
| Item | Implementation Complexity ???? | Resource Requirements ⚡ | Expected Outcomes ???? | Ideal Use Cases ???? | Key Advantages ⭐ |
|---|---|---|---|---|---|
| Vertical Display Systems | Medium: Requires setup and stability planning | Moderate: Shelving materials and transport | Increased product visibility and space efficiency | Small booths needing vertical space maximization | Maximizes limited space; cost-effective; professional look |
| Interactive Demo Stations | High: Continuous engagement and workspace setup | High: Workspace, materials, and energy | Customer engagement, trust-building, and buzz | Makers showcasing craft processes live | Builds personal connection; creates memorable experiences |
| Themed Booth Environments | High: Complex design and extended setup time | High: Props, decor, and transport | Strong brand differentiation and emotional engagement | Brands focusing on immersive experiences | Creates Instagrammable moments; premium pricing justified |
| Portable Tent and Canopy Systems | Medium: Quick setup but involves secure anchoring | Moderate to High: Tent, branding, and transport | Defined booth space with weather protection | Outdoor shows requiring weather safety | Weather protection; professional appearance; reusable investment |
| Lighting Enhancement Systems | Medium: Electrical setup and power management | Moderate: Lighting equipment and batteries | Improved product visibility and professional ambiance | Any booth needing consistent lighting | Enhances product colors; energy-efficient; adaptable lighting |
| Interactive Product Testing Areas | Medium: Setup of test zones and monitoring | Moderate: Additional inventory and sanitizing | Increased confidence and reduced returns | Hands-on product categories like skincare or utensils | Builds purchase confidence; differentiates from online shopping |
| Mobile Display Cart Systems | Medium: Modular assembly and wheel maintenance | Moderate: Mobile carts and transport | Flexible display arrangements and transport ease | Vendors with frequent booth changes or small spaces | Maximum flexibility; easy transport; multi-purpose functionality |
Putting It All Together: Your Blueprint for Booth Success
Moving beyond a simple table setup is the first step towards transforming your craft show presence from a hobbyist stand into a professional, profitable venture. The craft show display ideas we’ve explored are not just about aesthetics; they are strategic tools designed to stop shoppers in their tracks, draw them into your space, and guide them towards a purchase. Your booth is your temporary storefront, and it deserves the same level of care and planning as a permanent retail location.
By integrating concepts like vertical displays, you maximise your limited footprint, making every square centimetre work for you. An interactive demo station or product testing area does more than just show what your product does, it creates a memorable experience and builds customer confidence. These elements work together to tell your brand's story in a compelling, three-dimensional way.
Key Takeaways for a Winning Display
As you begin to plan your next event, remember these core principles. Success lies in the thoughtful combination of a few key strategies, not in trying to implement everything at once.
- Be Intentional with Layout: Your booth layout should have a clear flow. Guide customers on a journey from an eye-catching exterior to a focal point within, and finally to an easy and accessible payment area. Avoid creating dead ends or cramped spaces.
- Embrace Your Brand Identity: A themed environment or a consistent colour scheme isn't just decoration. It’s a powerful branding tool that makes your booth instantly recognisable and helps you stand out in a sea of exhibitors.
- Invest in Quality Infrastructure: Whether it’s a sturdy portable canopy, a versatile mobile cart, or an effective lighting system, investing in reliable equipment pays dividends. It ensures you look professional, protects your products, and makes your setup and teardown process far less stressful.
Your Actionable Next Steps
The real magic happens when you translate these ideas into a concrete plan. Don't wait until the week before your event to start thinking about your display. Start now by sketching out a potential layout, considering which of these concepts best showcases your specific products.
Practise your setup at home. Time yourself. See how the elements fit together in a 3x3 metre space. This trial run will reveal any potential issues, from a wobbly shelf to an extension cord that's just a little too short. It allows you to arrive on show day feeling confident and prepared, ready to focus on what truly matters: connecting with customers and selling your beautiful creations. Ultimately, a well-executed booth doesn't just display your products; it demonstrates your professionalism, reflects the quality of your work, and is one of the most powerful sales tools you have.
Ready to add that perfect finishing touch to your products and displays? The small details often make the biggest impact, and bespoke printed ribbon can elevate your packaging, signage, and overall brand aesthetic. Explore the endless creative possibilities and get high-quality, custom-printed ribbons from Ribbons4u Ltd to make your brand unforgettable.


 Facebook
 Twitter
 Pinterest