Front Door Bow: Create a Stunning Welcome with Easy DIY Tips (front door bow)

The secret to a jaw-dropping front door bow isn’t just about how you tie it—it all begins with choosing the right materials. Picking out a beautiful, durable ribbon is the single most important decision you'll make. It’s what guarantees your creation looks polished and can handle whatever the British weather throws at it.
Choosing the Right Materials for a Flawless Bow
Getting that perfect, voluminous bow that welcomes guests with a touch of class is much easier than you might think. It really comes down to the foundation: your ribbon and a few key tools. Making the right choices here is the difference between a sad, droopy bow and a crisp, professional one that holds its shape for weeks.
So, before you even start folding and tying, let's get the essentials together.
Selecting Your Perfect Ribbon
The star of the show is, without a doubt, the ribbon. The material you choose will dictate the bow's final look, its texture, and crucially, its durability.
- Wired Ribbon: This is the undisputed champion for front door bows, and for good reason. The fine wire hidden along the edges lets you sculpt and shape each loop perfectly, making sure they stay full and don’t collapse. For a truly professional finish, you can explore a wide variety of wired ribbons designed for structure and style.
- Velvet: Nothing says "Christmas" quite like a luxurious velvet bow. Its rich texture adds a real touch of elegance, but just be sure to pick one that's designed for outdoor use if it’s going to be exposed to the elements.
- Grosgrain: This ribbed fabric is incredibly sturdy and holds up brilliantly against wind and rain, which makes it a fantastic year-round choice for birthdays or other seasonal displays.
- Satin: While undeniably beautiful, standard satin can be slippery to work with and tends to sag when it gets wet. If you have your heart set on satin, go for a double-faced or, even better, a wired version for more structure.
A common mistake I see people make is grabbing a flimsy, unwired ribbon. While it’s lovely for wrapping gifts, it just doesn't have the body needed to create a full, lasting bow for your front door. Trust me, that wire is your best friend for achieving the perfect shape.
To help you decide, here’s a quick rundown of some popular choices and what they’re best for.
Ribbon Selection Guide for Your Front Door Bow
| Ribbon Type | Best For | Key Features | Recommended Widths |
|---|---|---|---|
| Wired Ribbon | The ultimate all-rounder for professional, structured bows. | Wire edges allow for easy shaping and long-lasting volume. Huge range of colours and patterns. | 10cm - 15cm |
| Velvet | A luxurious, traditional look, especially for Christmas. | Rich, deep texture that adds a touch of elegance. | 10cm - 15cm |
| Grosgrain | Durable, year-round displays and classic designs. | Sturdy, ribbed texture that holds its shape well and resists weather. | 7cm - 10cm |
| Outdoor Poly | Maximum weather resistance for exposed locations. | Waterproof and fade-resistant, designed to withstand rain and sun. | 10cm - 15cm |
Ultimately, a good quality wired ribbon gives you the most creative freedom and the best, longest-lasting results.
Determining Ribbon Width and Length
Size really does matter when you're trying to make a statement. The width and length of your ribbon will directly impact the scale and wow-factor of your finished bow.
For a standard UK front door, which is usually around 80-90cm wide, a ribbon width between 10cm and 15cm is ideal. Anything narrower can look a bit lost, whereas a wider ribbon creates a truly grand, show-stopping effect.
Now for the length. You'll need enough for the bow itself, the long trailing tails, and the "wrap" that goes around the door. A safe bet is to buy between 5 to 7 metres. This gives you plenty to play with, and it’s always better to have a little extra ribbon than to run out halfway through!
Essential Toolkit for Bow Making
Beyond the ribbon, you only need a few simple tools to make the whole process a breeze.
- Sharp Fabric Scissors: Don't struggle with blunt kitchen scissors! A dedicated pair will give you clean, crisp cuts without fraying the ribbon.
- Floral Wire or Pipe Cleaners: This is your secret weapon for cinching the centre of the bow tightly and keeping everything secure.
- Measuring Tape: Absolutely essential for making sure your tails and door wraps are perfectly even.
- Mounting Supplies: This could be anything from an over-door hook to removable adhesive hooks or even just a bit of extra floral wire, depending on your door.
Creating Three Popular Bow Styles From Scratch
Ready to go from admiring beautiful bows to actually making them? I promise, with the right technique, crafting a stunning front door bow is an incredibly rewarding process. We'll walk through three popular styles, each with its own personality, from the elegantly simple to the gorgeously grand.
This little graphic breaks down the foundational process that applies to pretty much any bow-making project you tackle.
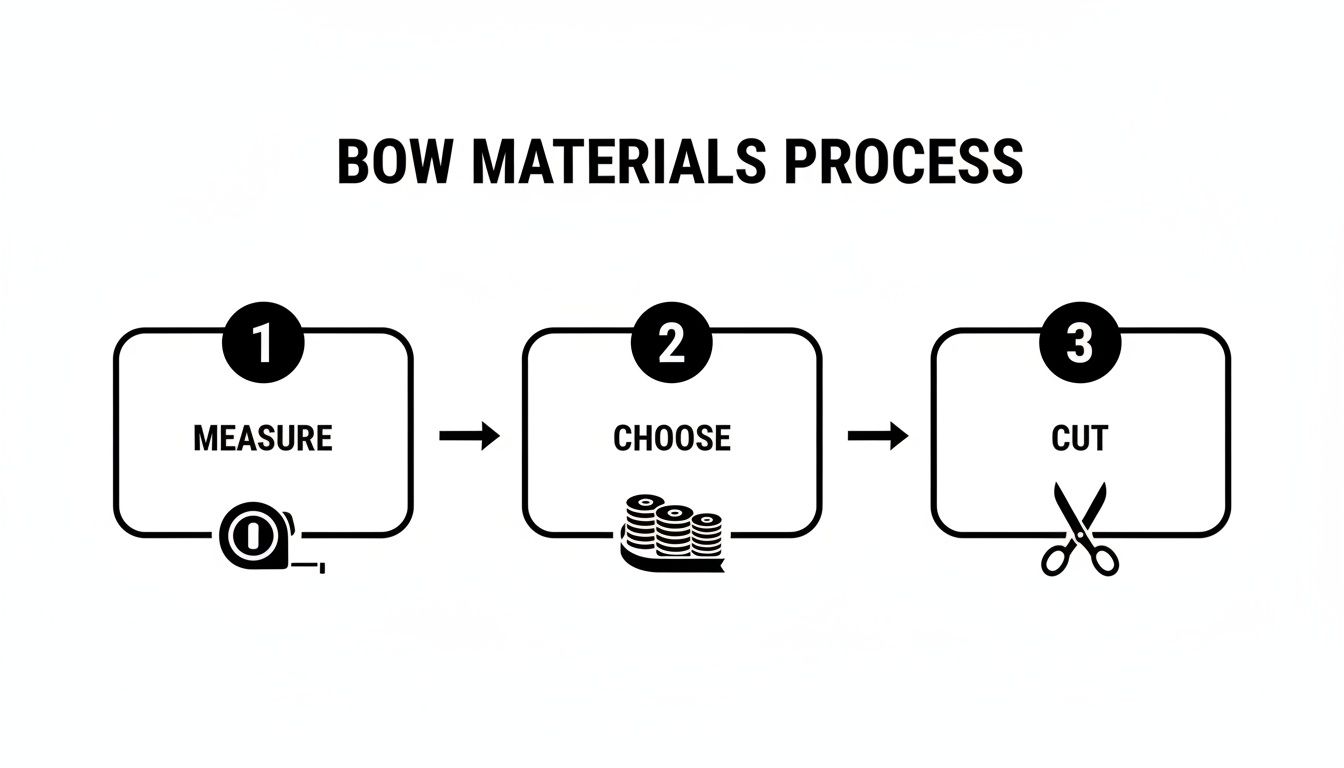
This simple flow—measure, choose, and cut—is your starting point. It’s all about making sure your project is well-planned so you can get it right the first time.
Crafting the Classic Loop Bow
The Classic Loop Bow is the quintessential choice for a reason—it’s elegant, versatile, and surprisingly straightforward to put together. This is the perfect style to master first, giving you a beautiful result for any season or celebration, from a birthday to a festive Christmas welcome.
To get started, create your first loop by folding over a length of ribbon, leaving a tail as long as you'd like. Pinch the base of that loop tightly between your thumb and forefinger. Now for the crucial bit: twist the long end of the ribbon 180 degrees so the "right" side is facing up again before you form your next loop in the opposite direction.
Keep repeating this process, making sure your loops are a consistent size on each side. I find that aiming for at least four to five loops on each side gives a lovely full, balanced appearance. Once you’re happy with the size, grab some floral wire and secure the centre, pulling it as taut as you can. The final touch is to fluff and shape the wired loops to create that perfect, rounded form.
Building a Lush Layered Bow
For a richer, more textured look, a layered bow is the way to go. The secret here is combining different ribbons—think a wide satin base paired with a narrower, patterned grosgrain or even a sparkly organza. This technique adds so much depth and a bespoke feel that truly stands out.
Start by making a simple bow with your widest ribbon, but make the loops slightly larger than you want your final bow to be. This will be your base layer.
Next, take your narrower, accent ribbon and create a slightly smaller bow directly on top of the first one. Then, secure both together right at the centre with a piece of floral wire.
- Tip 1: Don't be afraid to mix textures! A smooth satin with a ribbed grosgrain creates fantastic visual interest.
- Tip 2: Combine colours that complement your front door or seasonal décor. A navy base with a gold accent ribbon, for instance, looks incredibly chic.
This method allows for endless creativity. You can find even more brilliant ideas with these easy ribbon bow instructions for perfect bows which cover some extra techniques.
Designing an Oversized Statement Bow
When you want to deliver maximum kerb appeal, nothing beats an oversized statement bow. This style is all about drama and scale, making it perfect for grand entrances, special events, or simply making your home the most festive on the street. For this, you’ll definitely want a high-quality, wide wired ribbon, as its structure is absolutely essential for holding that larger shape.
The key to a successful oversized bow is consistency and tension. Make sure each loop is the same size and keep a firm grip on the centre as you build. If the centre is loose, the bow will droop and lose its impressive shape.
Start by making much larger loops than you would for a classic bow—I’d suggest around 15-20cm in length for each loop. Build up at least six to eight loops on each side to achieve that luxurious, full look.
When you secure the centre with floral wire, wrap it around multiple times to handle the extra weight and bulk of the ribbon. Once it's secure, spend a good amount of time "fluffing"—pulling the loops apart, shaping them, and arranging the tails to cascade beautifully. A well-fluffed oversized bow is a true showstopper.
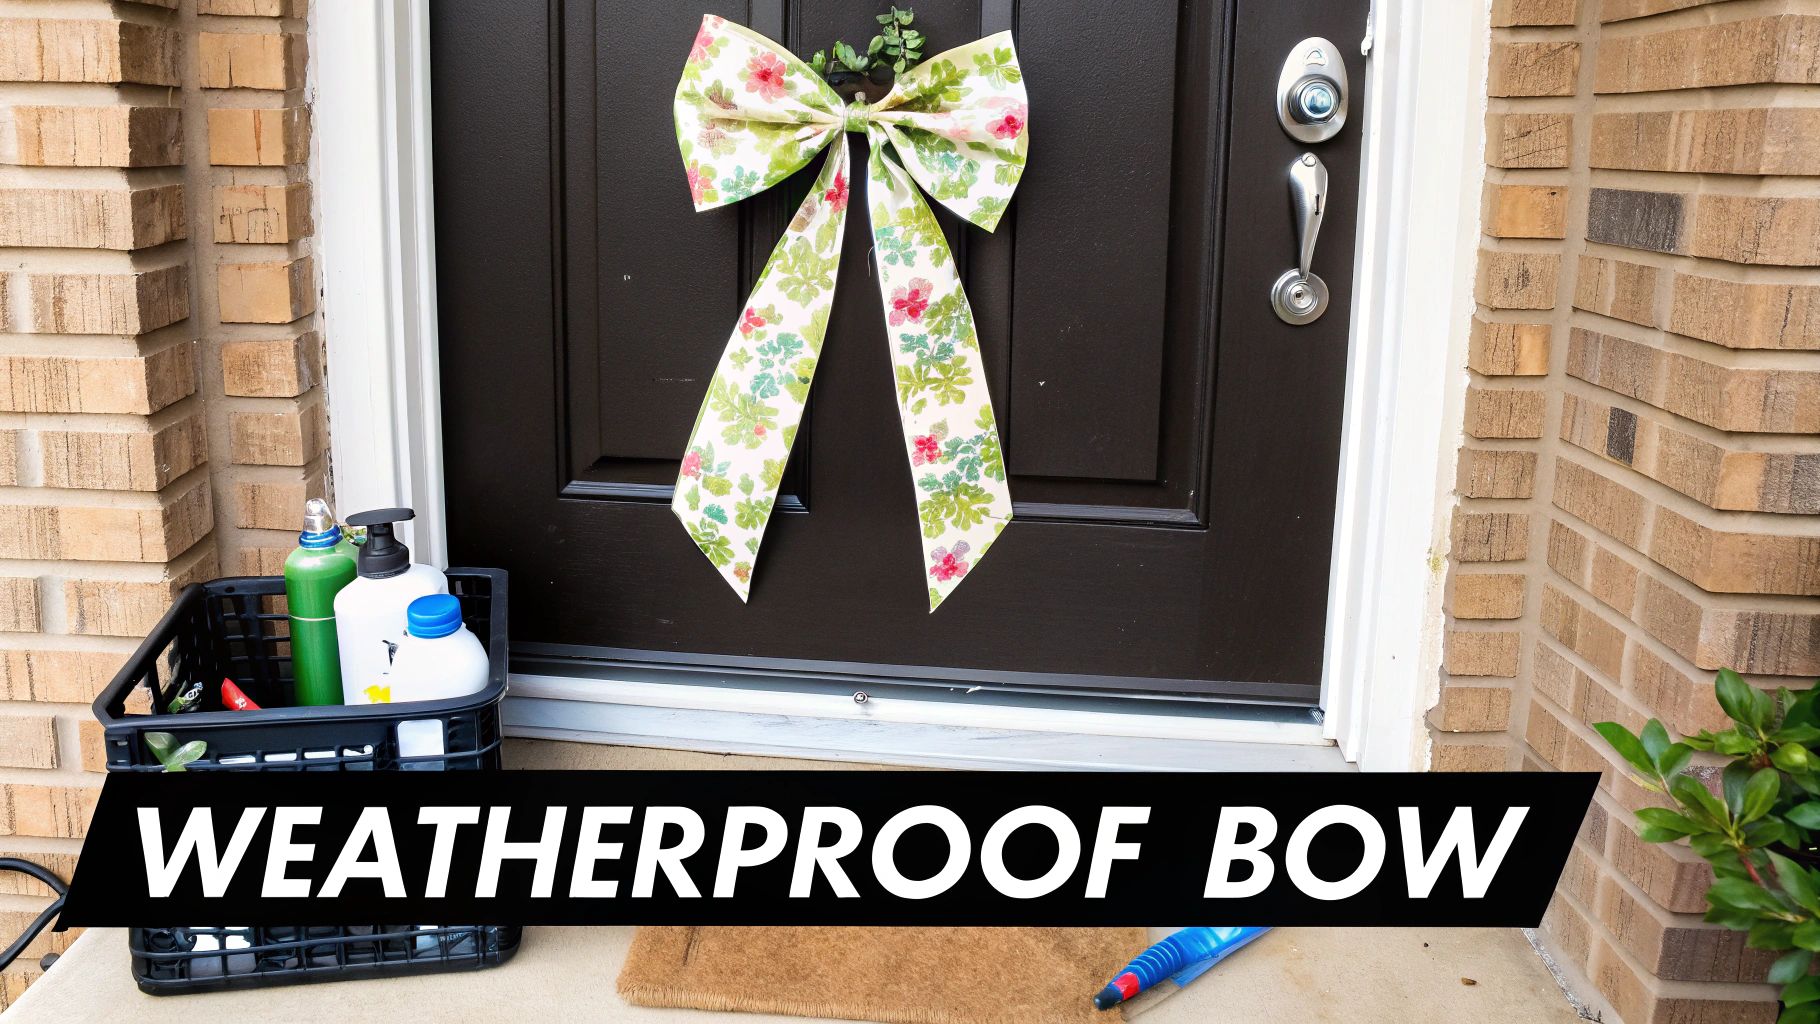
How to Install and Weatherproof Your Door Bow
You’ve crafted a stunning bow, and now it’s time for the final, crucial step: putting it on display. Getting your beautiful creation securely onto your door—and making sure it can handle the unpredictable British weather—is just as important as the making itself. A perfectly installed bow is the finishing touch that takes your handiwork from lovely to showstopping.
Let's get down to the practical side of things. We'll walk through the best ways to mount your bow without leaving a single mark and cover the essential tips for keeping it looking pristine, no matter what the weather throws at it.
Securing Your Bow Without Damage
How you hang your front door bow really comes down to the kind of door you have. The main goal is always the same: a secure fit that won’t scratch the paint, leave behind sticky residue, or cause any other damage.
- For UPVC or Composite Doors: An over-door wreath hanger is your best friend here. I always recommend finding one with a felt or rubber backing to protect the door's surface from scuffs. Another fantastic option is a high-quality, removable adhesive hook designed for outdoor use—just be sure to check the weight limit before you buy.
- For Traditional Wooden Doors: You’ve got a bit more flexibility. You can often loop some discreet floral wire around your door knocker or through the letterbox. For a completely invisible fixture, you could even install a tiny screw-in hook on the very top edge of the door, where no one will ever see it.
One of the most common mistakes I see is people reaching for nails or heavy-duty tape. This can permanently ruin your door's finish. Stick to temporary, non-destructive solutions for a much better result.
Whatever method you choose, make sure the bow is fixed tightly. A loose bow can shift around, bang against the door in the wind, and just look untidy, which undoes all your hard work.
Weatherproofing for Lasting Vibrancy
Nothing ruins a beautiful bow faster than a downpour. A soggy, drooping bow loses all its charm, and bright colours can fade surprisingly quickly in direct sunlight. Thankfully, a little bit of prep work makes a huge difference.
Your most effective weapon is pre-treatment. Before you even think about hanging the bow, give it a couple of light, even coats of a good fabric protector spray. The kind you’d use for upholstery or outdoor cushions is perfect. It creates an invisible barrier that helps rainwater simply bead up and roll off instead of soaking into the material.
This one simple step can dramatically extend the life of your bow, keeping it looking crisp and vibrant for weeks. Of course, for maximum durability, you could start with a product made for the job, like this red large bow for doors, which is crafted from weather-resistant materials right from the start.
Reinforcing Against Wind and Droop
Even with the best ribbon, gravity and gusty winds are not your friends. To fight back against drooping loops, especially on those gorgeous oversized bows, a little internal support goes a long way. I like to subtly weave a second piece of stiff floral wire through the back of each loop to help it hold that full, voluminous shape.
And what about the door wrap itself? Make sure the ribbon is pulled taut across the door before you secure it on the inside. A sagging wrap can make the whole display look a bit sloppy. On the inside of the door, where it won’t be seen, use strong tape or even a dab from a cool-melt glue gun to hold the ends firmly in place. These little expert touches are what keep your front door bow looking picture-perfect.
Styling Your Door Bow for Every Season and Occasion
A front door bow is so much more than just a decoration. Think of it as a versatile accessory that can instantly signal a celebration, reflect the changing seasons, or simply add a splash of personality to your home's exterior.
When you see it that way, a whole world of creative possibilities opens up, stretching far beyond the Christmas holidays. You can easily adapt your bow to suit any event, turning your entrance into a memorable focal point all year round.
Let's explore how to style your bow for different moments, transforming a simple ribbon into a statement piece that perfectly captures the spirit of the occasion.
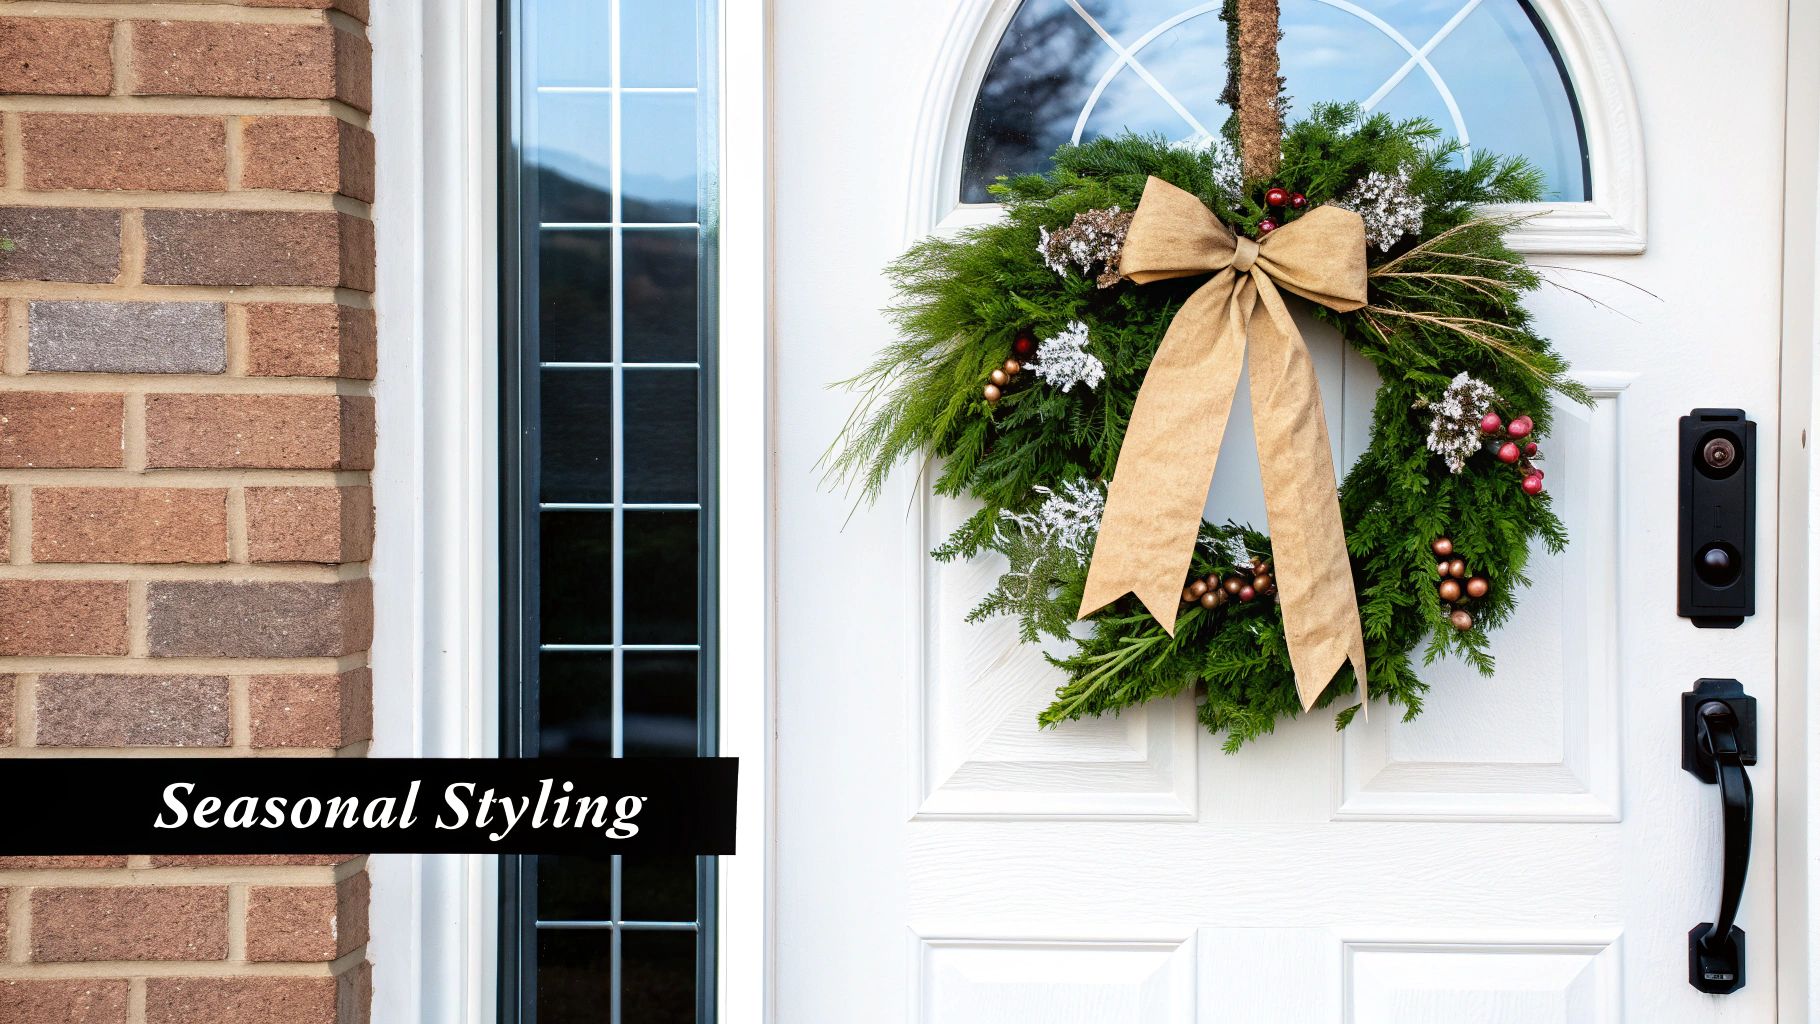
Celebrating the Seasons in Style
Matching your front door bow to the time of year is a simple way to keep your home’s exterior looking fresh and welcoming. I find that each season offers a unique colour palette and natural elements to draw inspiration from.
- Autumn: This is the time to embrace warm, rustic tones. Imagine a bow made from a deep orange or burgundy grosgrain ribbon, perhaps woven with dried wheat stalks or small faux pumpkins for that perfect harvest-festival feel.
- Winter: The classic season for a show-stopping display! A rich, red velvet bow is timeless, especially when you accent it with evergreen sprigs, pinecones, or even a string of warm, battery-operated fairy lights for a magical evening glow.
- Spring: Welcome the new season with light and airy pastels. A soft pink, baby blue, or mint green satin bow can be beautifully complemented with faux cherry blossoms or delicate pussy willow branches tucked into the centre.
- Summer: Go for bold, vibrant colours that really pop. A bright yellow, coral, or turquoise bow in a sturdy, weather-resistant material just screams sunny days. Adding a few faux sunflowers or a nautical-themed accent can complete the look perfectly.
Marking Special Life Moments
Your front door is the first thing guests see, making it the perfect canvas for celebrating personal milestones. A beautifully styled bow can set a joyful tone before anyone even steps inside.
For weddings, a front door bow is a cherished tradition. With the UK wedding industry hosting around 265,000 marriages annually, this simple decoration has become a hugely popular way for brides to signify the celebratory home on their big day. An elegant ivory or white satin bow, accented with delicate gypsophila or eucalyptus, provides a stunning backdrop for pre-ceremony photographs. You can find more insights on popular UK wedding traditions and statistics.
Why not add a custom touch for other events? For a baby announcement, you could combine pink and blue ribbons for a gender reveal, or choose a single colour for a welcome-home celebration. For a milestone birthday, a glittery gold or silver bow adds a touch of glamour.
Even corporate events can get in on the action. A bow in your company's brand colours on the office door creates an impressive and professional welcome for clients or a festive atmosphere for a staff party. The key is to choose colours and accents that tell a story, turning your front door into a personal announcement board. With the right Ribbons4u products, you can easily find the perfect ribbon to bring any of these visions to life.
Common Bow-Making Mistakes and How to Fix Them
Even the most seasoned crafters can end up with a front door bow that looks a bit... sad. A floppy loop here, an uneven tail there—it happens to the best of us. But don’t get frustrated and chuck that beautiful ribbon in the bin! Most common bow-making mishaps are surprisingly easy to fix with a few simple tweaks.
The good news is that these issues almost always boil down to a handful of common culprits. Once you know what to look for, you can troubleshoot your way to a perfect, perky bow every single time.
Why Your Bow Looks Limp and Lifeless
The number one complaint I hear is about floppy, droopy bows that just refuse to hold their shape. This is especially common when you’re going for those big, showstopper designs. If your bow looks deflated, the problem is almost certainly one of these three things:
- The Ribbon Choice: A flimsy, unwired ribbon simply doesn't have the internal structure it needs for a full, three-dimensional bow. It’s guaranteed to collapse under its own weight.
- Tension Troubles: If you're not keeping the ribbon pulled taut while forming each loop, you’re introducing slack that leads to sagging later on.
- A Loose Centre: This is the most critical mistake of all. The centre of the bow is its anchor. If it isn't secured as tightly as possible, the loops can't be "fluffed" out properly and will just fall flat.
To fix this, always, always start with a good quality wired ribbon. As you work, keep a firm, consistent grip. And when you go to secure the centre with your floral wire, pull it incredibly tight before twisting it off.
Think of the centre wire as the bow's spine. A strong, tight spine allows the rest of the bow to stand up tall and full. A loose one just results in a slumped, shapeless posture.
Correcting Lopsided and Uneven Loops
Does your bow look a bit off-balance, with bigger loops on one side than the other? This is a simple issue of consistency. It’s incredibly easy to lose track of your loop size as you twist and fold, resulting in an unbalanced final product.
The fix for this is surprisingly low-tech. Before you even start, decide on your ideal loop size. As you form that very first loop, use your hand as a guide—perhaps measuring it from the tip of your thumb to your little finger. For every single loop after that, measure it against the first one to make sure they are all identical.
Taking that extra moment for each loop is the real secret to achieving perfect symmetry. A balanced front door bow just looks far more professional and polished.
Your Front Door Bow Questions Answered
To wrap things up, let's get into some of the most common questions I hear from fellow crafters and event planners. Getting these details right can be the difference between a good bow and a truly stunning one.
How Much Ribbon Do I Need?
For a standard UK door, which is usually around 80-90cm wide, I always suggest starting with 5 to 7 metres of a nice, wide ribbon (10-15cm is ideal). This gives you more than enough to create the vertical and horizontal bands that wrap the door, plus plenty left for a big, luxurious bow with beautiful, flowing tails.
If you’re just making the bow itself without the door wrap, you can get away with 3-4 metres. A little pro tip? Always buy a bit more than you think you'll need. There’s nothing worse than getting a loop wrong and not having enough ribbon to fix it.
What Is the Best Ribbon for Outdoors?
When your bow has to stand up to the British weather, durability is key. Your best bet is a wired-edge ribbon made from a weather-resistant material like polypropylene or a tightly woven polyester grosgrain. That wire is your secret weapon—it helps the bow keep its gorgeous, full shape, even in wind and rain.
Velvet is a classic choice for Christmas and looks absolutely beautiful, but be warned: it can get heavy and soggy when it gets wet. If you’ve set your heart on velvet, look for a version specifically designed for outdoor use or give it a couple of coats of waterproofing fabric spray before you hang it.
My Bow Looks Flat, How Do I Fix It?
Ah, the dreaded flat bow! This is a problem every crafter faces at some point, and it usually comes down to one of three things. First, the ribbon itself. You need something with a bit of body, so a wired edge is non-negotiable if you want that full, three-dimensional look.
Second, check your tension. As you form each loop, you need to keep the ribbon pulled taut. Any slack will result in a droopy, sad-looking bow.
Finally—and this is the most crucial part—you have to secure the centre as tightly as you can with floral wire. A tightly cinched middle is what allows you to really fluff out the loops and create that professional, voluminous finish we’re all aiming for.
Ready to create your own show-stopping welcome? Find the perfect ribbon for any occasion at Ribbons4u Ltd and get started on your next project today. Discover our full collection at https://ribbonsforyou.com.


 Facebook
 Twitter
 Pinterest