Summer Ribbon Garland Project
Summer Ribbon Garlands

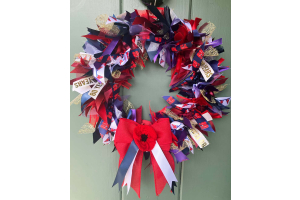
These summer ribbon garlands are great and were made by Julie in our office the other evening. I’m told that they took her two hours from start to finish and were orginially conceived as a summer garden decoration!
These are a lovely addition to any garden or wedding event this summer and are so versatile as they can be bespoke to meet your own requirements by the addition of bells, flowers, ivy or what ever takes your fancy. We couldn't believe how easy they were to make and as a result thought that we would publish our version of the instructions below for you all.
The garland shown in the images here is two metres long but we are offering them in a choice of widths up to 5m.

To make these you will need;
2.3m of Barley twist cord or similar thick cord, ours is 5mm thick the extra length is so that you can form a loop at each end.
200 x 17cm to 20cm long lengths of assorted ribbons, you can use longer lengths if you prefer which will make the Garland more bushy. However 200 will work well for a 2m garland length. We recommend that you cut the lengths at different angles which will enhance the over all look.
1m of string or 3mm ribbon or similar
Assortment of decorations to add to the garland if you wish.
If you have not got these items spare then we have put a Summer Kit together which has all of these in them with the exception of your personal decorative finishing touches, these can be found at:
Summer Garland Kit Click Here To View
Method

1) To start with take your cord and form a loop at the end then with the string or narrow ribbon tie the loop so that it is secure and wind the string / ribbon over the end to give a firm reinforced finish, this does not need to be to neat as it wont be very visible when your garland is complete.
2) Repeat this at the other end of the cord as well. You will use these loops to hang your garland so reinforcing them with the string just helps if you are planning to add heavier accessories to your finished garland.
3) Work out the order you would like your ribbon lengths to appear on your garland and cut your ribbon to length, anything between 17cm and 20cm lengths we find works well. They dont all have to be the same length and its worth cutting them all at slightly different angles as it adds to the finished look.
It may be worth while laying a few out first on the table and try some colour combinations. When you're happy with the look that these create, take the first length and tie this to the cord starting close to the loop at one end. We have tied ours with a simple cross over literally as if we were tying the first part of a shoe lace. So cross the two ends of the ribbon over each other then pass one end through the gap between them and pull both ends to tighten. Once attached to the cord you should be able to slide this slightly, which makes them easier to position.

4) Repeat this process and when tied push the second ribbon tight up to the first. Keep adding the ribbon lengths in the same method until you have filled the cord with ribbons. These should be tight against each other with no cord visible between the ribbon knots and should take about 200 lengths to cover 2m of cord. You can then twist and tighten any ribbons till you get the desired look.
5) To finish off simply work out where you would like to adorn your garland with bells or flowers and fix these on. On our garland we have added these using some narrow 3mm ribbon and some coloured string for the bells but you can use whatever you like there is no wrong or right to this what ever you feel works for the look your creating.
Your garland is now ready to hang, it’s as simple as that!
We hope you have enjoyed making this project and would love to hear your thoughts and see any photo's of your finished items.
If you have any questions then please feel free to contact us at any time and we will be only to pleased to help in any way we can.
Happy Garland Making
From The Simply Ribbons Team !


 Facebook
 Twitter
 Pinterest